Tampilkan postingan dengan label rudder. Tampilkan semua postingan

Pontoon Boat Plans Aluminum | Daggerboard planing rudder blank transom re enforcement Oar Prototype 1

| 0 komentar |

Pontoon Boat Plans Aluminum


Well, a busy frenetic post. Lots of small items got done over the past few days on my Goat Island Skiff.

Daggerboard planing:

The daggerboard needed to get smoothed out. It was a lumpy mess.


I didnt know whether to hit it with the orbital sander or my hand plane. I really just want to feed it through a real machine plane since I need to lose 2mm off the blank, but maybe Ill do that by hand... (?) However, in the end I got a roughly smoothed out daggerboard using my hand planes. It was not as tortuous as I thought it would be, and it all worked out pretty good in the end.


Rudder blank:

I also needed to get my rudder glued up. Initially this had not occured along the daggerboard due to the lack of appropriate timber, I had used my supply dedicated to the blades for the daggerboard mostly. However, I did have a lump of cedar left over from the stem. I had forgotten about this one. It took a few minutes of brainstorming, a couple of swipes on the table saw, and in no time I had my blank, and it was glued up on underneath the ubiquitous heat tent in my 45 deg. F garage.


A different wood pattern than the daggerboard, but that is OK by this amateur!

Transom:

Then it came to my attention that my transom was not backed up enough for the rudder. The intrepid reader will remember when I put the backing to the rudder gudgeons on the transom. It was a sticky mess. WELL I should have looked at Duckworks first and checked out the dimensions of the equipment I was going to use. Then, I could have fitted an appropriate backing. I did not. My backing was far too inadequate, so today I added sides to it for a 6" width, and then sandwiched on another solid layer on top.


The brick weighs it all down.

Finally, how in tarnation am I going to propel this boat when there is no wind? By oar!

Oars-- Oar Prototype #1:

My oarlocks, sockets, and another hatch came in the mail yesterday.

YAY MAIL!

The oarlocks are beautiful. I got two pairs of sockets, one for the gunwales, and another pair so I could have a socket on the transom, in case I lose an oarlock or oar, I can still yuloh my way to shore and safety. Search yuloh.

This also means it was time to try my hand at oar-making, which interested my lovely wife.

Jim Michalak offers us some oar plans in his book, Boatbuilding for Beginners, and I used those. Storer also has free oar plans available, but Michalaks were simpler, and I decided to mix and match a little bit. No problems, right? Haha.

My oars for the GIS should be about 9. Technically, 92", which is what we used. I bought two cheap pieces of pine lumber to make my oars, 10 long each. Each board will offer up all three layers for the laminate construction of this oar. The plans call for oars that are 6 11" long. We extended these oars 23" (27") by using a formula at Shaw and Tenny oar-makers extra-ordinaire.

58" (width lock to lock) / .5 = 29 + 3 = 31" of inboard length.

The grip on these plans are 5" long and the inboard portion of the loom is 16", so we added 10" to make it 26" + 5" = 31"

The remainder of the 27" was 17" and we added this to the outboard section of the loom.

Then, off to map the stations, trace and cut.

After some deliberation I decided to cut the entire oar, all three blanks, by hand. So away I ripped with my Japanese handsaw. It was more accurate than the jigsaw, and quieter. The table saw would have been a sweat-fest. Here we are, half-way through one side of the main blank:
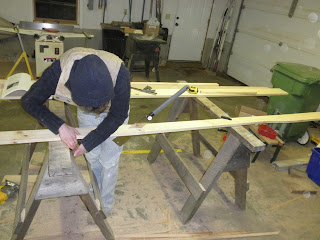

Then, with 4" to go on the last laminate side, a eye-knot snapped, and sent the last 6" of one of the laminates that attached to the blade soaring into the garage. BOO. I had just ripped 20 feet of board by hand, and the last 6" decided to let go.


So I decided that this end was going to get the shaft (haha) and it was going to be a little short. Prototype #1, right?

I did a mini-scarf by cutting right on through the two pieces, eliminated the knot, using the method illustrated below:


Then, off to the basement for the gluing!


Do you find information about Pontoon Boat Plans Aluminum are you looking for? If not, below may help you find more information about the Pontoon Boat Plans Aluminum. Thank you for visiting, have a great day.
Read More..

Boat Plans Aluminium | Glassing the rudder bottom skids and an almost finished mast!

| 0 komentar |

Boat Plans Aluminium


AHOY Mateys!!!

WELL, things are not so bad.  As my intrepid readers may remember I had a mini freak out over my poorly glassed rudder and daggerboard.  This was founded on the belief that it was going to take me forever and a day to get them smooth again.  Not so!  With encouragement from others I got right onto it once the epoxy had gone hard.  With a few deft swipes of my rasp, my random orbital sander, and my hand block, I got the rudder all smooth again in just a few minutes.  I also sized it up for glass.


Then, back down to the basement Boatcave for the actual glassing.  I ended up stringing the rudder to a ceiling beam with some string (obviously) and two nails on either end of the rudder.  Presto!  Since Im draping the glass over the blade, it makes it easier and neater, and I can work at it at eye level instead of hunching over it, which is good for my sore back.  Unfortunately, it can swing around if not careful, so sometimes a hand is needed to steady it.


First, I wet the blade with epoxy and then draped it carefully over the leading edge, with the trailing edge facing down.  Wetting out the glass makes it go clear.  I let the first coat go tacky and then came back for subsequent coats to completely fill the weave.  The extra glass will get sliced off once it sets up a bit.  It look beautiful.  I did get some epoxy runs, but those will sand out (with substantial effort).  Hopefully I wont run into this with the daggerboard, but I have to find out how first.

Then, off to the hull to put down some bottom skids.  These are made of cherry.  The plans call for two, a little over 10 feet long that run down the hull parallel to each other.  I decided to add a third in the bow for added bottom protection.  The bow has a nice rocker to it, but I will be sailing the Maine coast, and I also like to run my boats up onto the beach like a maniacal pirate looking for booty, both monetary and female (Im married, ladies, so its symbolic only now, sorry!)  Mr. Storer would prefer not glassing the bottom to save weight, I agree, and I dont want the hassle.  A bow skid was easy, light, and it will be effective.

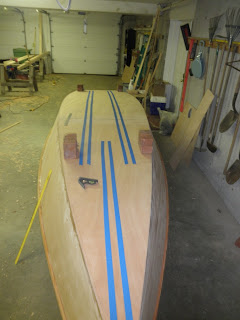
First, I measured, re-measured, measured again, and outlined the skids, then put down some tape to assist in epoxy clean-up


This was not effective, because I gave myself a little room between the theoretical skid and the tape, and it ended up being too much space.  At least they were good guidance!  My lovely wife aided in placing down the skids, because they would slip around and I was not interested in screwing them down (more holes to fill).  My patented "Forest of bricks" held them down.


Interestingly enough, the forest of bricks didnt get them down all the way.  The two parallel skids rose amidships a bit off the hull, I could actually get some light between the hull and skid.  Extra weight did little to help, and only deformed the hull.  Not acceptable!  I decided to let it go, squeezed in some epoxy and when it dries Ill throw down some mini-fillets to keep water from getting underneath.


I did not notice this during my dry run, so I dont know if it was the glue that bent them funny, or maybe I wasnt obsevant, or what, but Im not going to freak out over this.

AND FINALLY

My mast was tapered up.  Notice I havent added the base taper yet to fit into the mast step, but the wide staves have been taken down to match.  Heres an artsy fartsy photo:


WOW look at that sky!  Hmm Hmm New England goodness!  Dont see that in Seattle too much, lemme tell you, I am happy to be back east!

Heres the mast up against the garage:


So, the mast came out to be a tad wider than commanded in the plans, about 3mm or so... I may enlarge the partner just slightly to accommodate the mast, because I dont want to lose any strength in that area. 

Do you find information about Boat Plans Aluminium are you looking for? If not, below may help you find more information about the Boat Plans Aluminium. Thank you for visiting, have a great day.
Read More..

Boat Plans Nz | Rudder design 4 daggerboard glassing

| 0 komentar |

Boat Plans Nz


After many trips to the hardware store getting stainless steel carriage bolts and machine screws that were often the wrong size, I finally got my rudder box together in some sort of usable fashion.  As my intrepid readers may remember in three other previous posts (search in the month of March), I have been trying to figure something out in order to get my tiller to be detachable.  I went with the final option, illustrated in this post. 

The rudder box is glued up but not glued together.


As you can see, I am wearing my camo Converse sneakers.  Very cool.  The original tiller design calls for the tiller to be permanently attached to the top of the box, where my shortened tiller stock is now-- so originally that would be much longer, but permanent.  This way, I can remove the tiller and leave the rudder in the water, freeing up open space in the boat during quiet times.  I used a carriage bolt with a butterfly nut tensioned by a split washer.  Dont drop it, and carry a spare! 

The spacer is as of now temporary, but I could do one of three things.  I could lengthen the spacer to make it full-tiller length, giving the tiller laminate strength; I could shorten the spacer; I could make two evenly spaced spacers, I could leave it the way it is.  This is yet to be determined.  Heres a closeup for the interested:


Im having some serious problems with my hardware for the rudder, unfortunately.  I wanted a pintle and gudgeon style assembly, but my 1.5" gudgeons are not fitting around my rudder box, even though its 1.5" wide.  Something aint right.  Also, Id have to expand my tiller access hole in the transom to accommodate the up and down motion to get the rudder in and and out.  So Im scraping the pintle/gudgeon idea and Im going to go with the gudgeon/gudgeon idea, as the original plans stipulate.  Which means I have to find some sort of long pin to thread between all of them.  Boo to that. 

Also today Ive been working on my blades.  My rudder got sanded down to the matte finish, and I carefully taped off vertical areas that would run, and applied one last thin coat of epoxy onto one side of the rudder.  Tomorrow, the other side.  I used a plastic spreader, and it went very well, very smooth, and Im very happy with my luscious result:


Youll notice on the left hand side that the leading edge still isnt coated, this was taped off earlier.

Then, off to glassing my daggerboard!  Much like the same for the rudder, except I cut a bigger piece.  I had a lot of runs in my rudder, and I figured this time I would lay the board flat, spread epoxy with a squeegee, and then turn it over, do the other side, and then hang it up. 

So I went ahead and did one side horizontally:


 I thought I was being pretty smart. 

So then I turned it over and did the other side.  Something caught my attention and I looked underneath my board and...

... well I didnt take any pictures because needless to say the whole first side has very neatly peeled away from the board, thanks to Mr. Theory-of-Gravity.  Gravity is only a theory by the way, they should teach both sides in schools so kids know this, because there is lots of evidence that gravity does not exist, but "they" dont want to show you it.  I digress.  Today, gravity was obviously working quite well.  I finished the job at hand, and then hung it up, and re-spread the cloth down.  Fortunately not much damage done, but for my smartness, well, not so smart now.  Here it is all hung up to dry:


Its late, Im still periodically coating the board to get the weave filled, and Im tired.  I timed this one bad.

Thanks for reading!


Do you find information about Boat Plans Nz are you looking for? If not, below may help you find more information about the Boat Plans Nz. Thank you for visiting, have a great day.
Read More..

Boat Plans Catamaran | Fiberglass Tape epoxy encapsulation

| 0 komentar |

Boat Plans Catamaran


Yesterday was a bomber of a day.  Total Goat Island Skiff immersion.  Well over 14 hours of spanking.

Basically, I want to float test this boat.  My pond, frozen with several feet of New Hampshire ice iced out overnight.  I woke up two mornings ago to find that the ice cap had literally disappeared, and the boat was not ready.  So the hustle began.

First, I planed to fit a 3/8" poplar dowel for the the bow.  I scratched up the epoxy on the bow, scratched up the dowel, and stuck it on.  This will be glassed over with fiberglass tape.

I held it on with painters tape.

Then, off to the races.  Taping the chines with fiberglass tape (FT) is easy, and kind of rewarding.  First, I measured the tape to fit the chine, and cut it off.  Then I slopped on some unthickened epoxy along the chine, and placed the tape along it, dabbing it down to hold it in place.  This tape has a "selvage" edge to it, which according to the plans should be removed.  Basically, its a plastic string that holds the fabric together, but its a real pain in the ass to sand down, or so I am told.  It came out really smooth on the fiberglass I used for the blades, but on this FT it just mocked me incessantly.  So I said "screw it!" and glued it down with the edge on the bottom.  In case I couldnt sand it down at least it would partly hidden.  After the tape is laid down in position, I slopped on epoxy to wet it out and get it to stick.  Work from the middle to the ends of the boat.  Some gentle tugging got it in a good straight line and evenly over the rounded chine (round with a few passes of a plane and hit it with the sander).


 I did this to both sides, and the bottom/transom joint.  Im not sure if the side/transom joint needs to be done or not, and I can always do that later.  The bow will be glassed when the epoxy has cured on the dowel and I can fair it to the hull.

After that came the fun fun job of spreading the epoxy on the bottom and the sides.  I did the bottom first while I debated how to do the sides.


 I did not pre-coat my panels because A: I wanted to see my boat! and B: I wanted to ensure the most effective gluing surfaces and I did not feel like taping their positions off.

In retrospect, the bottom was very easy, the sides a little more work.  I would suggest that any builder at the very least, pre-coat the outside side of the sides for simplicities sake.  Pouring the epoxy onto the sides and spreading it around was a little more of a challenge on the vertical surface, but due diligence paid off for a pretty neat job.

Back to that selvage edge.  After the epoxy had cured a bit on the glass, I decided to grab my utility knife and see if I could cut it off!  I could, and it worked awesome.  Pulling it out first before glassing would have been preferred, but this was the next best thing.  Holding the blade close to the edge I was able to get a nice clean cut down the the length of the hull, and then all I had to do was pull it up.


Presto!  As you may notice you can still see the weave in the FT.  This weave took a lot more work to fill in than the glass on the blades.  On the suggestion of my compatriot in Sacramento, I threw on two coats of slightly thickened epoxy and it filled it in much better than the straight undiluted stuff.

Heres a before and after:


A long day, but worth it.  A float test is quickly looming in my future!


Do you find information about Boat Plans Catamaran are you looking for? If not, below may help you find more information about the Boat Plans Catamaran. Thank you for visiting, have a great day.
Read More..

Boat Plans For A Chesapeake Deadrise | Daggerboard trunk glued up and rear seat glued on

| 0 komentar |

Boat Plans For A Chesapeake Deadrise


Ok my patient mates, heres some photographic evidence of my work on the boat last week before I left for self-imposed exile at work.

First, I finally got that bedamned daggerboard trunk glued up.  Somehow, I wasnt forward thinking enough, and I glassed up the daggerboard without really giving much thought to how it fit in the already made trunk.  Well, I did but discounted further planing on of the daggerboard and decided that I was done with all the planing and sanding thank-you-very-much and whatever I had, I had.

This was most unfortunate, because I few more minutes of planing would have produced a superior quality board, and it would have fit in my daggerboard case.  So then I was stuck with the project of widening my case, but only by 2-3mm at most because really, all I needed was 1-2mm.

Fortunately, I found 3mm Okoume marine plywood at Goose Bay Lumber, and cut it to fit over the framing for the trunk.  This widened the trunk appropriately.  Here is the widening sequence in pictures:


Very self-explanatory, I think.

Next, I still struggle with the hardward issues for the rudder and transom gudgeons.  I dont know how Im going to get this rudder assembly attached to the boat.  The problem is that the hole to accomodate the tiller does not have the vertical clearance required to use a gudgeon-pintle scheme, which is by far the most convenient.  I toyed around with it and thought about enlarging my tiller-hole, but my pintle arms didnt fit around the rudder cassette.  A second order of larger, more heavy-duty gudgeons for rudder and transom fit great, except not with each other, and the arms were too long for the spacer in the cassette... A rod pushed through the gudgeons would not have fit cleanly and I would have had a clunky feeling rudder, the round peg in an oval opening thing, if you can visualize that.  So I still sit, wondering how I will fix this conundrum.  Many people have done it successfully, but Im still hunting around for the best hardware.

Because of all this drama, I have delayed gluing on the rear seat.  I got tired of having it loose, and glued it on before I left.  Here, yet again, is my "Forest of Bricks" holding it all down.


And the gratuitous parting shot:


Do you find information about Boat Plans For A Chesapeake Deadrise are you looking for? If not, below may help you find more information about the Boat Plans For A Chesapeake Deadrise. Thank you for visiting, have a great day.
Read More..

Boat Plans Canada | Float Test

| 0 komentar |

Boat Plans Canada


I couldnt take it anymore.  How would my ship, my Goat Island Skiff, my beauty, my instrument of adventure to wonderful and distant and nebulous ends sit on her lines?  Would she list, be bow heavy, stern heavy?  There were some things in the construction of her that didnt match the plans, some bevels, some shapes, some angles, and I was worried that in the water she would sit funny, maybe bow down a bit, instead of the beautiful plumb bow sitting upright!

My pond at my parents-in-law iced out rapidly last week, which motivated me to tape the chines and slap some epoxy on the sides of the hull.  Yesterday, it rained hard.  Today, we woke up at 7, and there was no rain, but wind, and 32*F/O*C.  Snow flurries on the horizon to the west.  My lovely wife ready to rock.  It was time.


Wind was blowing about a Force 5 on the Beaufort scale, around 20kts or so.  With ice-out just a few days ago, the water temperature wasnt much higher than the air temperature.

It was now, or another nail-biting day.  It was time.  A kiss on the breasthook, a quick murmur to her... "Please sit straight on your lines..." and with a heave, and a ho, she was in the water.


Not a maiden voyage, not a christening, nothing but a quick test.  She will get all the formalities and Poseidon will get all his tributes when she is worthy.  Just a float test... but exciting all the same.

...and DAMN if she doesnt look straight!

Do you find information about Boat Plans Canada are you looking for? If not, below may help you find more information about the Boat Plans Canada. Thank you for visiting, have a great day.
Read More..