Tampilkan postingan dengan label mast. Tampilkan semua postingan

Boat Plans Aluminium | Glassing the rudder bottom skids and an almost finished mast!

| 0 komentar |

Boat Plans Aluminium


AHOY Mateys!!!

WELL, things are not so bad.  As my intrepid readers may remember I had a mini freak out over my poorly glassed rudder and daggerboard.  This was founded on the belief that it was going to take me forever and a day to get them smooth again.  Not so!  With encouragement from others I got right onto it once the epoxy had gone hard.  With a few deft swipes of my rasp, my random orbital sander, and my hand block, I got the rudder all smooth again in just a few minutes.  I also sized it up for glass.


Then, back down to the basement Boatcave for the actual glassing.  I ended up stringing the rudder to a ceiling beam with some string (obviously) and two nails on either end of the rudder.  Presto!  Since Im draping the glass over the blade, it makes it easier and neater, and I can work at it at eye level instead of hunching over it, which is good for my sore back.  Unfortunately, it can swing around if not careful, so sometimes a hand is needed to steady it.


First, I wet the blade with epoxy and then draped it carefully over the leading edge, with the trailing edge facing down.  Wetting out the glass makes it go clear.  I let the first coat go tacky and then came back for subsequent coats to completely fill the weave.  The extra glass will get sliced off once it sets up a bit.  It look beautiful.  I did get some epoxy runs, but those will sand out (with substantial effort).  Hopefully I wont run into this with the daggerboard, but I have to find out how first.

Then, off to the hull to put down some bottom skids.  These are made of cherry.  The plans call for two, a little over 10 feet long that run down the hull parallel to each other.  I decided to add a third in the bow for added bottom protection.  The bow has a nice rocker to it, but I will be sailing the Maine coast, and I also like to run my boats up onto the beach like a maniacal pirate looking for booty, both monetary and female (Im married, ladies, so its symbolic only now, sorry!)  Mr. Storer would prefer not glassing the bottom to save weight, I agree, and I dont want the hassle.  A bow skid was easy, light, and it will be effective.

First, I measured, re-measured, measured again, and outlined the skids, then put down some tape to assist in epoxy clean-up
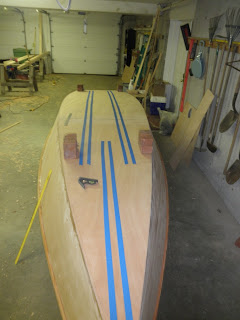

This was not effective, because I gave myself a little room between the theoretical skid and the tape, and it ended up being too much space.  At least they were good guidance!  My lovely wife aided in placing down the skids, because they would slip around and I was not interested in screwing them down (more holes to fill).  My patented "Forest of bricks" held them down.


Interestingly enough, the forest of bricks didnt get them down all the way.  The two parallel skids rose amidships a bit off the hull, I could actually get some light between the hull and skid.  Extra weight did little to help, and only deformed the hull.  Not acceptable!  I decided to let it go, squeezed in some epoxy and when it dries Ill throw down some mini-fillets to keep water from getting underneath.


I did not notice this during my dry run, so I dont know if it was the glue that bent them funny, or maybe I wasnt obsevant, or what, but Im not going to freak out over this.

AND FINALLY

My mast was tapered up.  Notice I havent added the base taper yet to fit into the mast step, but the wide staves have been taken down to match.  Heres an artsy fartsy photo:


WOW look at that sky!  Hmm Hmm New England goodness!  Dont see that in Seattle too much, lemme tell you, I am happy to be back east!

Heres the mast up against the garage:


So, the mast came out to be a tad wider than commanded in the plans, about 3mm or so... I may enlarge the partner just slightly to accommodate the mast, because I dont want to lose any strength in that area. 

Do you find information about Boat Plans Aluminium are you looking for? If not, below may help you find more information about the Boat Plans Aluminium. Thank you for visiting, have a great day.
Read More..

Boat Plans Catamaran | Fiberglass Tape epoxy encapsulation

| 0 komentar |

Boat Plans Catamaran


Yesterday was a bomber of a day.  Total Goat Island Skiff immersion.  Well over 14 hours of spanking.

Basically, I want to float test this boat.  My pond, frozen with several feet of New Hampshire ice iced out overnight.  I woke up two mornings ago to find that the ice cap had literally disappeared, and the boat was not ready.  So the hustle began.

First, I planed to fit a 3/8" poplar dowel for the the bow.  I scratched up the epoxy on the bow, scratched up the dowel, and stuck it on.  This will be glassed over with fiberglass tape.

I held it on with painters tape.

Then, off to the races.  Taping the chines with fiberglass tape (FT) is easy, and kind of rewarding.  First, I measured the tape to fit the chine, and cut it off.  Then I slopped on some unthickened epoxy along the chine, and placed the tape along it, dabbing it down to hold it in place.  This tape has a "selvage" edge to it, which according to the plans should be removed.  Basically, its a plastic string that holds the fabric together, but its a real pain in the ass to sand down, or so I am told.  It came out really smooth on the fiberglass I used for the blades, but on this FT it just mocked me incessantly.  So I said "screw it!" and glued it down with the edge on the bottom.  In case I couldnt sand it down at least it would partly hidden.  After the tape is laid down in position, I slopped on epoxy to wet it out and get it to stick.  Work from the middle to the ends of the boat.  Some gentle tugging got it in a good straight line and evenly over the rounded chine (round with a few passes of a plane and hit it with the sander).


 I did this to both sides, and the bottom/transom joint.  Im not sure if the side/transom joint needs to be done or not, and I can always do that later.  The bow will be glassed when the epoxy has cured on the dowel and I can fair it to the hull.

After that came the fun fun job of spreading the epoxy on the bottom and the sides.  I did the bottom first while I debated how to do the sides.


 I did not pre-coat my panels because A: I wanted to see my boat! and B: I wanted to ensure the most effective gluing surfaces and I did not feel like taping their positions off.

In retrospect, the bottom was very easy, the sides a little more work.  I would suggest that any builder at the very least, pre-coat the outside side of the sides for simplicities sake.  Pouring the epoxy onto the sides and spreading it around was a little more of a challenge on the vertical surface, but due diligence paid off for a pretty neat job.

Back to that selvage edge.  After the epoxy had cured a bit on the glass, I decided to grab my utility knife and see if I could cut it off!  I could, and it worked awesome.  Pulling it out first before glassing would have been preferred, but this was the next best thing.  Holding the blade close to the edge I was able to get a nice clean cut down the the length of the hull, and then all I had to do was pull it up.


Presto!  As you may notice you can still see the weave in the FT.  This weave took a lot more work to fill in than the glass on the blades.  On the suggestion of my compatriot in Sacramento, I threw on two coats of slightly thickened epoxy and it filled it in much better than the straight undiluted stuff.

Heres a before and after:


A long day, but worth it.  A float test is quickly looming in my future!


Do you find information about Boat Plans Catamaran are you looking for? If not, below may help you find more information about the Boat Plans Catamaran. Thank you for visiting, have a great day.
Read More..

Boat Plans For A Chesapeake Deadrise | Daggerboard trunk glued up and rear seat glued on

| 0 komentar |

Boat Plans For A Chesapeake Deadrise


Ok my patient mates, heres some photographic evidence of my work on the boat last week before I left for self-imposed exile at work.

First, I finally got that bedamned daggerboard trunk glued up.  Somehow, I wasnt forward thinking enough, and I glassed up the daggerboard without really giving much thought to how it fit in the already made trunk.  Well, I did but discounted further planing on of the daggerboard and decided that I was done with all the planing and sanding thank-you-very-much and whatever I had, I had.

This was most unfortunate, because I few more minutes of planing would have produced a superior quality board, and it would have fit in my daggerboard case.  So then I was stuck with the project of widening my case, but only by 2-3mm at most because really, all I needed was 1-2mm.

Fortunately, I found 3mm Okoume marine plywood at Goose Bay Lumber, and cut it to fit over the framing for the trunk.  This widened the trunk appropriately.  Here is the widening sequence in pictures:


Very self-explanatory, I think.

Next, I still struggle with the hardward issues for the rudder and transom gudgeons.  I dont know how Im going to get this rudder assembly attached to the boat.  The problem is that the hole to accomodate the tiller does not have the vertical clearance required to use a gudgeon-pintle scheme, which is by far the most convenient.  I toyed around with it and thought about enlarging my tiller-hole, but my pintle arms didnt fit around the rudder cassette.  A second order of larger, more heavy-duty gudgeons for rudder and transom fit great, except not with each other, and the arms were too long for the spacer in the cassette... A rod pushed through the gudgeons would not have fit cleanly and I would have had a clunky feeling rudder, the round peg in an oval opening thing, if you can visualize that.  So I still sit, wondering how I will fix this conundrum.  Many people have done it successfully, but Im still hunting around for the best hardware.

Because of all this drama, I have delayed gluing on the rear seat.  I got tired of having it loose, and glued it on before I left.  Here, yet again, is my "Forest of Bricks" holding it all down.


And the gratuitous parting shot:


Do you find information about Boat Plans For A Chesapeake Deadrise are you looking for? If not, below may help you find more information about the Boat Plans For A Chesapeake Deadrise. Thank you for visiting, have a great day.
Read More..

Boat Plans Arch Davis | Working on the mast for SEI

| 0 komentar |

Boat Plans Arch Davis


Beefing up the mast.

Chuck Leinweber at Duckworksmagazine.com has been using a woven fiberglass sleeve to reinforce the wooden masts he’s made for the various boats he’s built.
As far as I know he’s been using fairly cheap lumber for the birdsmouth system spars, and with the glass sleeve over them there has been no failures even when pushed very hard in events such as the Texas 200 and Everglades Challenge.

Heres his catalogue listing along with a little video showing how the glass sleeve is applied.

http://www.duckworksbbs.com/supplies/cloth/sleeving/index.htm

When visiting last year I had a look at what he’s done, looked over the material and decided that I’d give the stuff a try.  So, today, got the parcel out, sanded the mast blank off a little and got into it.

Its like a Chinese Finger Puzzle, push the ends together and it gets bigger in diameter, pull and it gets skinnier.  To apply, I shoved my hand down it while pushing the ends in, made it big enough to fit the mast through easily, and slid it through.  Taped the butt end to the wood and smoothed out the glass sleeve running my hands toward the other end making it smaller and a close fit as I went.


 I put a tape around the mast at the top end of the sleeve, this to provide a clean end to cut the strands of fiberglass to.  Next, I taped the end to the mast to control it while wetting out, and got into it with a brush and epoxy.


With two layers of gloves on, I smoothed the layup out, working from the start end up to the top of the mast pushing any bubbles out as I went.

This is fairly heavy fiberglass, and it soaks up quite a lot of resin, this 3.5m length took 300ml of resin. 
To see how the sleeve would work if I were to use Peel Ply or a similar substitute to control the resin content and finish, I wrapped plastic masking tape around the lower 800mm or so ( I ran out of tape)  and checked the rest to make sure it was properly wetted out.  I’m away for two days, and will pull the tape off when I get back so lets see how it comes out.


After all this was done, I was sitting on my bunk reading and sipping my mug of tea, watching this guy sitting on the end of my dock.  He or she is a Pied Shag, quite a big bird, similar to a Cormorant.  There are lots of them here as well as their cousins the "Little black shags" and the occasional King shag.  Its that time of year when the birds are seeking mates and making nests, so there is lots of interest and activity here on the river.  


Do you find information about Boat Plans Arch Davis are you looking for? If not, below may help you find more information about the Boat Plans Arch Davis. Thank you for visiting, have a great day.
Read More..

Boat Plans Wooden | New post!

| 0 komentar |

Boat Plans Wooden


With nothing in it!

Work on the Goat Island Skiff has been temporarily stopped due to a return to work/on the road status.

I have pictures of some work I did just before I left, but they are unfortunately inaccessible at this point in time.  Stay tuned until next week!

Do you find information about Boat Plans Wooden are you looking for? If not, below may help you find more information about the Boat Plans Wooden. Thank you for visiting, have a great day.
Read More..

Small Boat Plans And Kits | Rudder and daggerboard ready to be shaped mast lumber!

| 0 komentar |

Small Boat Plans And Kits


Today was a surprisingly uneventful day in the my personal Goat Island Skiff world.  Ive been stumbling around lately trying to get traction on a number of projects, some held up by other projects that needed to be completed.  Two large steps forward happened today.

First:  I wandered into Goose Bay Lumber haphazardly and found 4 pieces of 20 x1x4 finished Douglas Fir boards.  All of them were straight, maybe three knots in the bunch, and relatively nice straight grain to boot.  Just four, all four were good, I grabbed them.  These will be my mast that powers my vessel.  I had them cut to 15 8", since the mast is just a smidge over 15 6" tall, this gives me an inch of "oof" space.  Also, they had a 15" planer, I had my daggerboard, and we fed it into the mouth of the machine.  It spit it out a little thinner, and nice and smooth on one side.  The planer was not a precision machine, and while I can lose 0.75mm, Id rather do that by hand than take out a huge chunk or something.  But it helped.

Second:  I called my bro-in-law and he was home, with his 13" planer.  I strapped my mast bits onto the roof of my sedan in a fashion that screamed "I will impale the person in front of me if you rear-end me" and roared up the interstate to the second planer.  In short order I planed my rudder down to the requisite 22mm and it came out amazing.  Then, away I planed my mast stock down to the 1/2" it needs to be.  Back on the roof with a little less mass and a little more wobbliness and back to my garage where I trimmed the trailing edge of my blades and got them ready for shaping.


Heres my mast stock. Hmmmm Hmmm delicious stock.


So I need to shape the rudder, to make the rudder box, so I can install the rudder hardware to the boat, so I can finally glue down the rear seat.  Then, daggerboard so I can glue down the centercase.  Then, make the mast, make some spars, and then I can start finishing my boat.  One day, one step, at a time.

Do you find information about Small Boat Plans And Kits are you looking for? If not, below may help you find more information about the Small Boat Plans And Kits. Thank you for visiting, have a great day.
Read More..

Boat Plans At Mystic Seaport | Mast glued up rudder and daggerboard glassing

| 0 komentar |

Boat Plans At Mystic Seaport


Ok, another frustrating boatbuilding day here in New Hampshire.

The mast got glued up today in a long session.  It takes a deceptively large amount of glue.

First, I laid down the mast ladder frame, with the two sides to be glued next to it.  I primed the wood to be glue with unthickened epoxy, and then made up the thick stuff.  Application of the glue went along the base plug, narrow staves, and ladder framework.  Afterwards, I picked up the ladder section and placed it upside down on the wide stave.  The other side of the ladder was then glued up and the wide stave dropped onto that, making a sandwich.  Mr. Storer recommends a clamp every foot.  I only have 9 clamps that can be used on the mast.  Mr. Storer advises his customers to use packing tape... use a clamp, wrap the mast with packing tape to hold the pressure, move on.  This method has been used by other Goat Island Skiff builders, successfully.  It kind of worked for me, but not to the degree I would have liked, the clamps hold more pressure.  Regardless, better than nothing, and with some careful maneuvering I was able to make sure that all gaps were closed up.


It took longer than I thought, and a lot more glue than I thought.  There were a few areas where I really had to force the staves into position, and this was a pain.  For some reason I dont have any real overlap in the lower half part of the mast or I could have used nails to hold it in place.  I used my muscles instead, and clamped them down, and hoped for the best.  In  a few locations theres an overlap on one side and an underlap on another... not much, about 1mm, but I see it, and it pisses me off.  I should be building to tighter tolerances by now.  I dont know if its impatience to get this done with, or its a level of meticulousness that drives me batty.

Off to check the bottom runners, shall we?

Oh look, gaps!


 In my quest to use less glue (I keep throwing out tons of squeezed out glue) I went with what I thought was a moderate amount of glue... but it obviously wasnt enough.  These are, surprisingly, my worst scarfs on this boat yet.  This is not the end of the world, I can force some glue in there, they are not necessarily under pressure (that would compromise the scarf) and they will fully glued onto the hull.  So this is not the end of the world.

This is:


My daggerboard.  What a mess.  I was so concentrated and focused on making sure I got it smooth around the end of the board, I didnt really care what happened along the edges of the glass.  I figured I could sand it smooth later.  Now, Im realizing I really screwed myself up the wazoo.  This clean up job without going through the soft wood of the board is going to murder my day tomorrow.  UGH.


Do you find information about Boat Plans At Mystic Seaport are you looking for? If not, below may help you find more information about the Boat Plans At Mystic Seaport. Thank you for visiting, have a great day.
Read More..

Boat Plans Australia | Mast in boat re epoxy ing and neat turtles

| 0 komentar |

Boat Plans Australia


So, Ive been pre-occupied recently with other events, namely, my impending return to work after some serious back-rehab (phys. therapists = good), some life events, and so on and so forth.  So, this is good.  Im broke, my back is better (which means I can actually do some work in the hull as opposed to just staring at the bottom of the boat), and springtime is coming.

One harbinger of spring is the emergence of turtles through their long torpor and into the light once again.  Today I ran into this chap, a Blandings Turtle which is actually considered endangered in New Hampshire.  They dont mate until their late teens, and they can live to around 80.  Anyway, I moved this guy for a photo-op only to later find out theyre endangered in NH, so I feel like an ass, but I treated him gently and placed him back right back where I found him.  Actually, this could be a her, I should find out.  Handsome, regardless:


I will report this to the Dept. of Fish and Game, they keep track of this stuff.  I also reported a Bobcat that came trundling through my yard two days ago.  That, was neat, but it was too quick and I have no photo.  Sorry.
ON TO THE YACHT!

With the mast all built, I tapered the base per the plans.  If you remember, I made the mast slightly larger than the plans called for, not much, just 1mm here and there, but it affected the fit in the mast partner and step, and those had to be enlarged.  This was not a big deal, its only a little bit and if you may recall, intrepid reader, I made the stock of the partner and step bigger than called for.  So I feel safe doing this.  Here is my great friend Matt, recently returned from Overseas Adventures Extra-Ordinaire doing his duty, and helping me out at the annoying task of rasping the mast partner larger.  Welcome home:


He did a most fantastic job.  Then I ruined it.

After some rasping and Dremel-ing the heck out of the mast step, we got the mast stepped:


I offer you many vantage points.  The overhead is kind of neat.
The mast is currently being fiberglass-taped right now, two tapes at the base, two at the top, and two amidships, one covering the single knot in the lumber.

Also being worked on is the hull.  I sanded the epoxy coating I gave it the other day, and added a third coat.  This was a technique I stumbled upon doing my BHs.  If I sanded and then added a last coat, it came out super smooth.  Im hoping for the same with the hull, especially since the Im trying to get the fiberglass tape down smooth.  After aggressive sanding, Im thinking the extra coat will fill up to the gap.  Here she is, sanded:


So next up, I have to figure out the rudder hardware problem.  This is worthy of another post.  I cannot, for the life of me, get my rudder hardware figured out, and its beginning to piss me off.  By hardware I mean what attaches the rudder stock to the transom.  Some gudgeons are too small, others are too big, Im going nuts.  Also, I have to figure out what to do with my daggerboard trunk.  It needs to be, literally 1mm wider, and I dont know how to do that.  A lot of glue, maybe? when I glue it together?  These are two items that are holding me up.  Also, I have to epxoy coat the inside of the boat, with nice weather finally on its way, there shouldnt be a hold-up.  I really want the hull ready for paint when and if I get some time off from work to come back home.  If Im home for 24 hours, I want to be able to get mucho stuff done.  So that is what Im staging for right now.

Do you find information about Boat Plans Australia are you looking for? If not, below may help you find more information about the Boat Plans Australia. Thank you for visiting, have a great day.
Read More..

Boat Plans Uk | Epoxy coating the interior and more turtles

| 0 komentar |

Boat Plans Uk


Today I took advantage of some free time and some of the most glorious weather you can imagine in beautiful New England this time of year!

Drum roll please.......

I epoxy coated the interior of my Goat Island Skiff! Yeah!

This is big for two reasons:  One, I wasnt looking forward to it, Two, my back has been in such a state that I havent physically been able to do it.  Being able to reach down in there and coat up the inside was a real good feeling, lemme tell you!  I was stoked.  Again, physical therapy = awesome.

So, coating the interior is much like the exterior.  It came out very neat, too.  I am pleased with the result.  Heres a romantic picture of her in the sunset, just her and me:


 She looks good.  So far, Ive done two coats of epoxy.  Im supposed to do three, which I did on the exterior, but I feel like two is good enough especially since its not going to be saturated in water.  Not to mention its going to be covered in two coats of primer and two coats of paint.  I should be ok.  Maybe I will do three layers on the bottom and chinelogs...

That all being said, I want to point out again how she can ride on her side when turning her over:


This is HUGE.  To those who have extensive dinghy experience, you all know exactly what Im talking about:  Turn the boat over, get it on a side, attempt to balance it on the gunwale, fail, catch the boat, wrestle around one of the ends in an attempt to get to the other side, fail, watch boat fall to ground in a random direction, wince at possible damage, etc etc etc.  It sucks.  This baby, she rests on her side.  You can walk away.  Drink a beer.  Pick your nose.  Go on vacation.  She will sit, on her side, patiently.  Awesome.

Finally, I caught a Painted Turtle today.  This is a quite common turtle on the North American continent, and not as big or as long lived as the Blandings Turtle that I found a few days ago.  Whats neat about this one is that Ive been trying to catch one for a year.  Now, that doesnt mean Im out everyday like its my job, but many attempts and sneaky approaches have been tried, to no avail.  Catching this guy, while swimming, is a minor coup for you know who.  Me.  Quite beautiful.  Hissed at me when I picked it out of the water.  I put it back where I found it, and I hope it forgives me.

A little grumpy.  


Do you find information about Boat Plans Uk are you looking for? If not, below may help you find more information about the Boat Plans Uk. Thank you for visiting, have a great day.
Read More..