Tampilkan postingan dengan label more. Tampilkan semua postingan

Boat Plans Aluminium | More paint

| 0 komentar |

Boat Plans Aluminium


I usually try for Thursday or Friday for each weeks post, but I’m a day or two early this week.
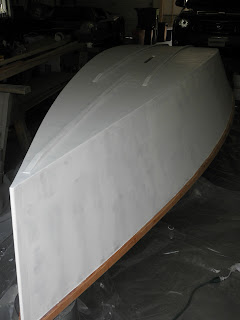
Painting is happening.  Yeehah! Not far to go now.

When painting, the undercoat tends to show up all the nasties, the blips and bumps that should have been sanded out the holes that were not filled, the  high spots that should have been taken down, nail heads that still show and the glossy bits on the epoxy that should have been flatted off.
All the bits you don’t want people to see. 

So I paint early, just one coat of primer undercoat, then go over it with the sander and filler,  that’s where I’m at now with SEI.
I’ve got one end primer painted, I’m sanding at the other end, mainly with the magic FEIN multitool in triangle sander mode, the point of the triangle amazingly effective at sanding the radius in the corner fillets, and I’m finish sanding and am hiding the worst of the blemishes with filler back in the stern.

I figured I’d try a little of the colours, I’ve gone lighter and brighter than usual as the paint, apart from the gunwale, is satin finish so wont reflect as much light. That plus selecting from a tiny square of colour on a piece of card with two dozen others is a bit of a raffle.
I have mixed feelings on the result, it’s a bit “toy soldier”,  maybe duller colours next time.
But the paint has been bought, has been mixed and is there, so that’s whats going to be used.  I’m sure I’ll get to like it in a while.


Bright colours, they look better when the paints dried to its satin finish, and I think Ill put a little more green in the mix to make it slightly darker. Might even do something to dull the red a bit.
Still, whats life without some experimentation.


 The shops in a mess Ive some extra gear and nowhere much to put it so the next job after the boats done is to build more shelving up high.  Need that storage.
But the boats looking ok, Ive not made an exceptionally nice job of her, shes a hurried build but structurally ok.  Really shes a testbed and proof of concept build, and Ive had rather a lot of other things that needed attention so its a bit of "do as I say not as I do" in this case.

In places the paint looks good, hides lots of sins, the next coat will hide all that. I’m working my way forwards with sander, filler and brush as the wind howls in the trees around the shed.  Its rough water out there on the estuary, with the wind against the tide its definitely not kayak weather.  Inside the shed, working away dreaming of days out on sparkling water with gentle breezes is just fine, so being in here with the paintbrush and sander is no hardship.


Do you find information about Boat Plans Aluminium are you looking for? If not, below may help you find more information about the Boat Plans Aluminium. Thank you for visiting, have a great day.
Read More..

Boat Plans Pdf | Painting Priming

| 0 komentar |

Boat Plans Pdf


We are now in the finishing stages of this particular Goat Island Skiff.  Shes coming down the home stretch, I tell you!

To be honest with you, dear intrepid reader, I am several posts out of date with the current going-ons.  Work has been a killer recently and I just cant get on top of it.  Back to work tomorrow to boot, and I still havent done my laundry.  Lets just say time at home is at a super mega premium.

The boat, once faired, was ready for priming.  To accomplish this, I wanted a good sanding job over her so the primer would adhere real nice like.  Using stacks of 120 grit discs on my random obit sander (ROS) I spent a bulk of a day sanding her down to a nice matte finish.


 You can see the Quick Fair that I gushed about in the last post.  Also notice the buckets, without the towels on them.  This was a slip-up on my end, and they ended up gouging the transom.  Smooth-move Ex-Lax!!!  Im such a moron.  The boat is taped up, including the ends of the ply.  These are kind of critical since they are exposed ends of ply that will be submerged at times.  They are well encapsulated in epoxy and I will paint them as well.  This adds protection, and a classic look.

Then, for the first coat of primer!  I used a quart of Interlux Pre-Kote primer, slightly thinned with Interlux 333, a thinning agent.  This stuff is mega-not-cheap, as in 34 bucks a quart, or 136 bucks a gallon, if youre the type that enjoys heart attacks.  It is a high-build primer, which means it will fill small irregularities in the prepped surface.  In practice, the painter will apply one coat, sand it down leaving the crevasses filled with primer, and then throw on another coat of primer, lightly sand it smooth, and then top-coat.

Initially the primer went on rather thick, I didnt thin it at first.  A few drops helped things along immensely.  I used a roller, and the roller would apply the paint unevenly, heavy where the roller initially absorbed the paint and then thinner on the other sections, leaving a speed-bump appearance to paint coverage.  Later research at the paint store revealed some roller tricks, which I will cover later.  Here is the boat, with the first coat of primer.


Then, its time to sand away!  Again, using the ROS and 120 grit discs.  I sanded outside, as this stuff tends to blow dust everywhere, which it did.  My father-in-law has a little car in the garage that he fawns over, I didnt want to get it dusty.  Fortunately, I had good weather, and was able to charge ahead.


Shes looking like a proper work-boat now.  This took a few hours.  I used many sanding discs, about one every three to four feet initially, and then in subsequent passes a increased the acreage with a disc.  The point is to get a good clean cut and not be pressing down trying to get a filled-up worn-down disc to grind away, smooth is the point. Speaking of smooth, this primer, albeit dusty, was quite smooth to the touch, surprisingly so.  After this, I de-dusted her by blowing with a shop-vac, vacuuming with said shop vac, and then rubbing down with cloth soaked in something flammable or toxic, like 333 or de-natured alcohol.  After that dried, the next coat of primer


WOW!  Shes coming along now!  AND THEN I had to leave for work, and I left her for 5 days.  This was not necessarily good, because this primer can absorb humidity, which can then prevent adhesion of the top-coat.  For 5 days I chewed my fingers down to bloody stumps pounding on Intellicast looking for possible bad weather.  I left explicit instructions with my parents-in-law about when to have the garage open or closed.  Fortunately, things turned out great weather wise!

More on painting later.  Im also varnishing my mast.  My wife is helping and she is doing a fantastic job.


Notice the tree is green.  This means GO, as in GO SAILING, as in FINISH THIS BOAT.  Im trying!  Im trying!

When I got back from my trip, I immediately set to sanding the second coat of primer.  Again, same as before, but a little less aggressive this time.  I wanted to keep the primer, but wanted to smooth it out.


Thats not my dog.

The paint and the sun illuminated some things on my boat.  When I faired the boat with Quick Fair I was absolutely anal to make sure I got smooth chines.  I wanted to make sure I had the fairest boat I could possibly have.  I actually spent hard-earned days off fairing and then waiting for it to cure so I could sand it and then fair again before I started the long painting procedure.

So imagine my surprise when I get her out in the sun after she was painted in something that shows shadows really well, like, lets say, a white primer.


OH THE PAIN!!!  WHERE DID THIS COME FROM?  Im heartbroken, a little bit.  I put in the ruler to help you judge.  Its a 16" ruler.  I swear on whatever holy tome of your choice, that I did not notice this when it was in the garage.  I even used setting-sun light to grab inconsistencies like this on the boat, and didnt see it.  It happens sporadically on the port chine, specifically.  The starboard came out pretty bitching if I may say so myself.  Needless to say Im disappointed.  My friend Matt who is always swatting away the mental flies that cloud my judgement was good enough to say something that went like this:  "Im sure I wont notice it, just add it to your laundry list of items you want to take care of next winter, theyre going to rack up anyway as you sail it this year."

Hes right.  If I was home every night I would take my time and lollygag around and be able to fix this.  Time for me is at a premium.  Every day I spend on details like this could translate into weeks and/or months of delays for me.  I screwed it up, I have to live with it for now.  Its actually not that bad, in this picture it looks horocious (new word), but in reality its not that bad.  Surface scum will obscure it anyway.


Do you find information about Boat Plans Pdf are you looking for? If not, below may help you find more information about the Boat Plans Pdf. Thank you for visiting, have a great day.
Read More..

Boat Plans Wooden | Saturday Night Special

| 0 komentar |

Boat Plans Wooden


Saturday Night Special build

There are several builders of this design aiming at next years Texs 200,  we’re hoping for a fleet of them, some to be available as fundraiser charters  to raise money for cancer research.

To recap the project, the build projects and the sponsorship to help build them is being managed by Jackie Monies ,  and we’re hoping for half a dozen to front up on day one of the Texas 200 next year.

Phil McCowin decided that this sounded like fun, and is busy building one with which to participate, I’m pleased to say that I’ll be his crew.  I’m very much looking forward to this event.

Phil has his SNS all planked up, she’s looking lean and slippery.  Do bear in mind that the design is intended to be a very quick build so the build standard is not fancy, just basic carpentry rather than a lesson in “how to build a heritage standard boat”.  To give you an idea of how the build goes I asked Phil how long it took to plank her, and he tells me that it took about 6 1/2 hours, thats the chine panels and topsides, essentially from a basic frame to "a boat". One day with coffee and lunch breaks.


She has just the simplest structure and basic interior which means shes light, quick and easy to build, and may well be the most bang you’ll get for the buck.
She’ll be fast, capable of planing on most points of sail, has a lot of bouyancy built in and in the strong quartering tailwinds that characterise the T200 course at that time of year should be a fun ride.

Here are some of Phils  pics from the Saturday Night Special Facebook page,  you can see more over there.  Thanks Phil.

 Plans are available from www.duckworksmagazine.com  


Do you find information about Boat Plans Wooden are you looking for? If not, below may help you find more information about the Boat Plans Wooden. Thank you for visiting, have a great day.
Read More..

Boat Plans And Kits | The new boat the design and the first piece of ply cut

| 0 komentar |

Boat Plans And Kits


Long Steps, the build has begun.

I’ve four frames drawn, the stem, and the spine for the forward section, the mast box and some of the detail around the “cabin”.
The drawing is progressing in my “spare time” as I’ve other jobs to get completed before I’m really free to get on with my own project, but I need a break now and again and wanted to get started on “Long Steps” so the overall timeline does not become impossible.

To give an outline of “the project”.  I have thoughts that as the numbers on my birthday cake are getting alarmingly large, its evident that if I am to have that life defining adventure then I’d best get on with it.
A second motivator was an article in the newspaper last year that described the adventures of a young woman who’d kayaked alone right around New Zealand. It took her a year to cover the distance of around 2100 sea miles, with a few of breaks along the way. What an adventure, she’ll remember that forever.

I’m not quite as ambitious as that, but to get around the North Island is workable.
That’s about 1300 nautical miles, only a little less than the distance  around the British Isles, or the distance from San Diego to Seattle. About, don’t quibble over the odd mile or three.
In an open sail and oar boat. Mostly open anyway.

The circumnavigation of Te Ika a Maui ( North Island of New Zealand)  has some challenges, I’m planning to try local voyages first, and have put a lot of thought into the design,  so, below is a pic of the working drawing.
She’s 5.520 metres long, 1.660 wide, I’d expect a dry weight of around 220 kg.
That’s 18ft 6in x 5 ft 5in x 460 lbs.
Sail area 13.5 sq m / 145 sq ft.


One of the “interesting” things about the planned voyage is that there are at least two long stretches with either bar harbours with prevailing onshore winds or no shelter at all, even in favourable conditions these two stretches of coastline could take up to three days to cover so nights at sea have to be provided for.
Shallow draft is a must, there are some shallow river harbours in some places, but much of the course will be in very open waters, so this is to be essentially a blue water capable boat.

Now I’ve mentioned this to people who’ve banged on about Shackleton and Bligh, but I’m not that tough, so safety, self reliance in emergencies and a modicum of creature comforts are all part of the design brief.

What I’ve done is to take the midsection of the very successful SCAMP design, with its high up bouyancy, sheltered “veranda”, self draining cockpit and water ballast.  The same offset “board” and lying down space is there, along with the massive dry storage that the little boat offers.
This is fitted into a hull shape similar to that of the “Walkabout” design, that boat is very fast under sail, rows well, is easy to right if capsized, and is a very good load carrier.

The ducks and batten marking the curve of the stem.

I started the build today, drew out full sized and cut the stem and spine, cut and glued the doublers around the stem, cut and finished a stack of cleat material and sanded the whole lot so they’re going into the boat almost completely “finished”.

The first cut, thats a Makita 10.6 volt cordless circular saw, nice tool, very accurate, light and easy to use. Its great on plywood up to about 12mm.

The spine, stem, and mast box support will have B#1  B#2 and B#3 slotted over it egg crate style.
The jigsaw is a Makita 4200 BV, Ive had it for over 30 years and its done a huge amount of work.
Good machine.  As is the Japanese saw, wouldnt be without either of them.

Doublers cut out, the edges radiused with a router and all glued up. Progress already!

Tomorrow will see B#1 and B#2 cut out, I expect to be putting the whole lot together on the building frame in January, I have to extend the floor in the boatshed, plus have an adventure in the Straights of Magellan which will soak up a few weeks around the end of the year.

Plus I still have to get some work done.

But I’ve started. The boatshed / workshop is not empty any more, the symptoms of empty workshop syndrome are under control again.


Do you find information about Boat Plans And Kits are you looking for? If not, below may help you find more information about the Boat Plans And Kits. Thank you for visiting, have a great day.
Read More..

Boat Blind Plans | Getting small items done

| 0 komentar |

Boat Blind Plans


Slowly but surely, carefully, things are coming along!

My second gunwale is scarfed and glued! As you can see, the epoxy will glue your bricks to the wood too! I had to chisel the brick off the wood, and it left brick behind which was further chiseled. This is my nicest, tightest scarf to date... on this side. Little more of a gap on the other side which is too bad, because the tight side will be glued to the boat due to a curvature in the wood that already nicely conforms to the hull.


My mast step and mast partner are glued up, in place, and ready to be cut open to fit the mast and then glued down. I doubled up the mast partner because the top of BH2 can be easily twisted by hand. By doubling it up, it stiffens it considerably. This makes me feel better after the chaotic gluing job around these bulkheads:


My bow knee came out well except for two things 1. I forgot that it was to be placed OVER the stem. My stem comes up to the edges of the ply, no room to slip it over. This means I will have to either slip it behind the stem or on top of it. I will ask Storer for recommendations. My bow was also considerably wider than the number provided by Storer for the knee. I would highly recommend tracing real world bow to your piece of lumber prior to cutting. Remember to keep the gunwales fastened. My stern knees, by comparison, came out great (I traced the real deal and did not go by the numbers provided by Storer). The great thing about my stern knees is that they are interchangeable, as in, both corners are the same! Yes! Precision building yes! Notice my mail. This is where I throw my bills. Then when I glue on the aft seat, they will be sealed in forever, and all my financial problems will disappear!

Because my workshop is a walk from my assembly point in the garage, my hull is becoming my new holding bin/workshop.


Its also dusty in there! My lonesome bike, covered in wood dust. Primarily this dust is from the wood cherry countertops being built by my brother in law right behind me, but the picture is cooler if everyone thinks its coming from my boat!


In addition,

1. my side arms for BH2 and 4 are cut and beveled to the sides (again, I waited until I got my boat assembled to match them to the actual hull)

2. inwale spacers are cut

I would like warmer temps in the garage before I start gluing things. As of right now, strictly hull, non-gluing, I need to do the following:

1. Cut out the mast holes in the partner and step

2. Scarf inwales

3. Finish fitting bow seat (waiting for gluing of seat cleats)

Other than that, rudder, daggerboard, mast and spars, centerboard trunk.

I am very close to having a totally completed hull.

Do you find information about Boat Blind Plans are you looking for? If not, below may help you find more information about the Boat Blind Plans. Thank you for visiting, have a great day.
Read More..

Boat Plans Uk | Epoxy coating the interior and more turtles

| 0 komentar |

Boat Plans Uk


Today I took advantage of some free time and some of the most glorious weather you can imagine in beautiful New England this time of year!

Drum roll please.......

I epoxy coated the interior of my Goat Island Skiff! Yeah!

This is big for two reasons:  One, I wasnt looking forward to it, Two, my back has been in such a state that I havent physically been able to do it.  Being able to reach down in there and coat up the inside was a real good feeling, lemme tell you!  I was stoked.  Again, physical therapy = awesome.

So, coating the interior is much like the exterior.  It came out very neat, too.  I am pleased with the result.  Heres a romantic picture of her in the sunset, just her and me:


 She looks good.  So far, Ive done two coats of epoxy.  Im supposed to do three, which I did on the exterior, but I feel like two is good enough especially since its not going to be saturated in water.  Not to mention its going to be covered in two coats of primer and two coats of paint.  I should be ok.  Maybe I will do three layers on the bottom and chinelogs...

That all being said, I want to point out again how she can ride on her side when turning her over:


This is HUGE.  To those who have extensive dinghy experience, you all know exactly what Im talking about:  Turn the boat over, get it on a side, attempt to balance it on the gunwale, fail, catch the boat, wrestle around one of the ends in an attempt to get to the other side, fail, watch boat fall to ground in a random direction, wince at possible damage, etc etc etc.  It sucks.  This baby, she rests on her side.  You can walk away.  Drink a beer.  Pick your nose.  Go on vacation.  She will sit, on her side, patiently.  Awesome.

Finally, I caught a Painted Turtle today.  This is a quite common turtle on the North American continent, and not as big or as long lived as the Blandings Turtle that I found a few days ago.  Whats neat about this one is that Ive been trying to catch one for a year.  Now, that doesnt mean Im out everyday like its my job, but many attempts and sneaky approaches have been tried, to no avail.  Catching this guy, while swimming, is a minor coup for you know who.  Me.  Quite beautiful.  Hissed at me when I picked it out of the water.  I put it back where I found it, and I hope it forgives me.

A little grumpy.  


Do you find information about Boat Plans Uk are you looking for? If not, below may help you find more information about the Boat Plans Uk. Thank you for visiting, have a great day.
Read More..

Boat Designs And Plans | Transom

| 0 komentar |

Boat Designs And Plans


The transom is ready for gluing. I spent mucho time preparing the top frame last night, I cut it wide with the jigsaw and then sanded it down to match the ply, so this took quite a while. I was being cautious. Everything fits nice and tight and perfect. I am pleased with the result of taking my time with this important element.


AND THEN

I screwed up. I was cutting out the hole for the tiller. I carefully plotted everything out, carefully cut everything out, sanded smooth and inspected for variations. Along the top cut, I noticed I had ever-so-gently strayed "north" and my top cut was not as true as my bottom cut. "NO PROBLEMO" I muttered, whilst grabbing the jigsaw firing it up. "Ill just trim it straight out easy peasey! The fact that maybe the power tool wasnt the best idea didnt cross my mind and I proceeded to venture boldly north now, as opposed to gently stray. goddammit. Now the radius of the corner doesnt match the width of the hole, the top cut is wobbly and not even parallel anymore, and Im super scared to keep cutting to get it straight, because even with a jig clamped down for the jigsaw, I wasnt getting a straight cut. So Im leaving my wobbly, diagonal, cut as a two part lesson: a: SLOW DOWN. b: Its OK to screw up. Im owning up to it, and Im walking away from my almost-but-not-quite perfect transom.


Tomorrow, I will do the first gluing, and stay tuned for some exciting new boat developments!

Do you find information about Boat Designs And Plans are you looking for? If not, below may help you find more information about the Boat Designs And Plans. Thank you for visiting, have a great day.
Read More..

Boat Plans Building | On the metaphorical road again heading for more small boat sailing adventures

| 0 komentar |

Boat Plans Building


The brotherhood of the travelling boots.

Its occurred to me that the hikers boots that I’m wearing have been to seven different countries so far, they’re good friends the two of them, get along well even though they’re almost twins. One of course is a lefty and the other a righty but even so they seem able to co operate and generally arrive wherever it is that they’re going at about the same time.

I’m on my way again, this time to Chile,  will arrive in Santiago in about 18 hours.
Right now I’m sitting in Auckland International airport, within a few metres of the Percival Gull aircraft that Jean Batten flew from England to New Zealand in 1936, setting a number of aviation records on the way.  That flight took 11 days and 45 minutes to cover a bit more than 14000 miles. 
I’m going to be travelling in an aircraft that barely resembles that tiny single engined spruce and canvas plane.  In fact it would be no real problem to fit the “Gull” into the cargo hold of the big Boeing that I’ll be imprisoned within for the 13 ½ hour flight across the Southern Pacific Ocean. We’ll be travelling at around 590 nautical miles per hour, how different it is from Jean in her little light plane t125 mph.  I bet she didn’t complain about the cabin service in her tiny cockpit .


Jean Battens Percival Gull airplane, as I write this Im sitting about 2metres away from the wingtip on the left of the picture, its a graceful little thing, but a real reminder of how much aviation has progressed since then, remember too that Jean Batten was with us until 1982, so most of this amazing progress has happened within the space of a long lifetime.

This trip I’m making is by the way the longest uninterrupted stretch of ocean that there is north of the five great capes about twice the distance that it is across the North Atlantic from USA to UK.

Which brings me to why I’m travelling.  I’m to meet up with friend and co teacher Howard Rice, and we’re going to be setting up for the big voyage of exploration that he is undertaking next southern summer.
That voyage, in a modified SCAMP, all of 11 ft 11 in long ( 3.575M ) will leave from Punta Arenas in the Straights of Magellan, carry him out through the channels and straights into the Pacific where he’ll turn left, and head south toward Cape Horn.
That latter is not necessarily the objective of the voyage, but rounding “The Horn” is a possibility.  The real purpose of the voyage is to explore the least populated and most rugged coastline on the planet,  riven with steep sided fjords, many with glaciers at their heads, backed by mountains, many un named as yet, and battered by the incessant gale force winds of the Roaring 40s this is an extraordinary place, and one which Howard will be exploring, and documenting.
There will be cameras on the boat, as well as within his support crew back at Punta Arenas, there is already some video “in the can” and the intention is to make a comprehensive video of the voyage, a video which will be available to anyone wishing to see the grandeur of the wildest place on the planet from the viewpoint of a small boat sailor.
There is more on the boat and the voyage in Howards Facebook page here
https://www.facebook.com/search/top/?q=howard%20rices


Yes it costs by the way, and if you’d like to support this, check out the directors website here. http://www.below40south.com.  There is also a lot of information on the voyage there.

  Any donations would be very gratefully received, we’re covered for the actual filming but the production costs will be significant and even a small amount would help to get what will be one of the great small boat adventures out where people can share it.

So I’m sitting here in Auckland airport with several hours to wait until the big silver bird roars down the runway and turns out eastward over the sea.
Its not boring, I’m in a quiet corner upstairs, this is one of the better airports that I travel through, and I’m alongside a glass wall where I can watch the people flow like a gently stirred anthill.  It’s the arrivals area just below me, and there are friends, parents, siblings and visitors arriving, it’s heart warming watching the enthusiasm and emotion with which they are being welcomed.

But I’m going the other way, I’ll be among that crowd downstairs in 20 days.


Do you find information about Boat Plans Building are you looking for? If not, below may help you find more information about the Boat Plans Building. Thank you for visiting, have a great day.
Read More..