Tampilkan postingan dengan label coating. Tampilkan semua postingan

Boat Plans Pdf | Painting Priming

| 0 komentar |

Boat Plans Pdf


We are now in the finishing stages of this particular Goat Island Skiff.  Shes coming down the home stretch, I tell you!

To be honest with you, dear intrepid reader, I am several posts out of date with the current going-ons.  Work has been a killer recently and I just cant get on top of it.  Back to work tomorrow to boot, and I still havent done my laundry.  Lets just say time at home is at a super mega premium.

The boat, once faired, was ready for priming.  To accomplish this, I wanted a good sanding job over her so the primer would adhere real nice like.  Using stacks of 120 grit discs on my random obit sander (ROS) I spent a bulk of a day sanding her down to a nice matte finish.


 You can see the Quick Fair that I gushed about in the last post.  Also notice the buckets, without the towels on them.  This was a slip-up on my end, and they ended up gouging the transom.  Smooth-move Ex-Lax!!!  Im such a moron.  The boat is taped up, including the ends of the ply.  These are kind of critical since they are exposed ends of ply that will be submerged at times.  They are well encapsulated in epoxy and I will paint them as well.  This adds protection, and a classic look.

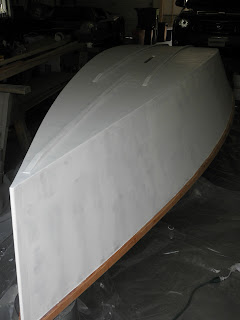
Then, for the first coat of primer!  I used a quart of Interlux Pre-Kote primer, slightly thinned with Interlux 333, a thinning agent.  This stuff is mega-not-cheap, as in 34 bucks a quart, or 136 bucks a gallon, if youre the type that enjoys heart attacks.  It is a high-build primer, which means it will fill small irregularities in the prepped surface.  In practice, the painter will apply one coat, sand it down leaving the crevasses filled with primer, and then throw on another coat of primer, lightly sand it smooth, and then top-coat.

Initially the primer went on rather thick, I didnt thin it at first.  A few drops helped things along immensely.  I used a roller, and the roller would apply the paint unevenly, heavy where the roller initially absorbed the paint and then thinner on the other sections, leaving a speed-bump appearance to paint coverage.  Later research at the paint store revealed some roller tricks, which I will cover later.  Here is the boat, with the first coat of primer.


Then, its time to sand away!  Again, using the ROS and 120 grit discs.  I sanded outside, as this stuff tends to blow dust everywhere, which it did.  My father-in-law has a little car in the garage that he fawns over, I didnt want to get it dusty.  Fortunately, I had good weather, and was able to charge ahead.


Shes looking like a proper work-boat now.  This took a few hours.  I used many sanding discs, about one every three to four feet initially, and then in subsequent passes a increased the acreage with a disc.  The point is to get a good clean cut and not be pressing down trying to get a filled-up worn-down disc to grind away, smooth is the point. Speaking of smooth, this primer, albeit dusty, was quite smooth to the touch, surprisingly so.  After this, I de-dusted her by blowing with a shop-vac, vacuuming with said shop vac, and then rubbing down with cloth soaked in something flammable or toxic, like 333 or de-natured alcohol.  After that dried, the next coat of primer


WOW!  Shes coming along now!  AND THEN I had to leave for work, and I left her for 5 days.  This was not necessarily good, because this primer can absorb humidity, which can then prevent adhesion of the top-coat.  For 5 days I chewed my fingers down to bloody stumps pounding on Intellicast looking for possible bad weather.  I left explicit instructions with my parents-in-law about when to have the garage open or closed.  Fortunately, things turned out great weather wise!

More on painting later.  Im also varnishing my mast.  My wife is helping and she is doing a fantastic job.


Notice the tree is green.  This means GO, as in GO SAILING, as in FINISH THIS BOAT.  Im trying!  Im trying!

When I got back from my trip, I immediately set to sanding the second coat of primer.  Again, same as before, but a little less aggressive this time.  I wanted to keep the primer, but wanted to smooth it out.


Thats not my dog.

The paint and the sun illuminated some things on my boat.  When I faired the boat with Quick Fair I was absolutely anal to make sure I got smooth chines.  I wanted to make sure I had the fairest boat I could possibly have.  I actually spent hard-earned days off fairing and then waiting for it to cure so I could sand it and then fair again before I started the long painting procedure.

So imagine my surprise when I get her out in the sun after she was painted in something that shows shadows really well, like, lets say, a white primer.


OH THE PAIN!!!  WHERE DID THIS COME FROM?  Im heartbroken, a little bit.  I put in the ruler to help you judge.  Its a 16" ruler.  I swear on whatever holy tome of your choice, that I did not notice this when it was in the garage.  I even used setting-sun light to grab inconsistencies like this on the boat, and didnt see it.  It happens sporadically on the port chine, specifically.  The starboard came out pretty bitching if I may say so myself.  Needless to say Im disappointed.  My friend Matt who is always swatting away the mental flies that cloud my judgement was good enough to say something that went like this:  "Im sure I wont notice it, just add it to your laundry list of items you want to take care of next winter, theyre going to rack up anyway as you sail it this year."

Hes right.  If I was home every night I would take my time and lollygag around and be able to fix this.  Time for me is at a premium.  Every day I spend on details like this could translate into weeks and/or months of delays for me.  I screwed it up, I have to live with it for now.  Its actually not that bad, in this picture it looks horocious (new word), but in reality its not that bad.  Surface scum will obscure it anyway.


Do you find information about Boat Plans Pdf are you looking for? If not, below may help you find more information about the Boat Plans Pdf. Thank you for visiting, have a great day.
Read More..

Boat Plans Uk | Epoxy coating the interior and more turtles

| 0 komentar |

Boat Plans Uk


Today I took advantage of some free time and some of the most glorious weather you can imagine in beautiful New England this time of year!

Drum roll please.......

I epoxy coated the interior of my Goat Island Skiff! Yeah!

This is big for two reasons:  One, I wasnt looking forward to it, Two, my back has been in such a state that I havent physically been able to do it.  Being able to reach down in there and coat up the inside was a real good feeling, lemme tell you!  I was stoked.  Again, physical therapy = awesome.

So, coating the interior is much like the exterior.  It came out very neat, too.  I am pleased with the result.  Heres a romantic picture of her in the sunset, just her and me:


 She looks good.  So far, Ive done two coats of epoxy.  Im supposed to do three, which I did on the exterior, but I feel like two is good enough especially since its not going to be saturated in water.  Not to mention its going to be covered in two coats of primer and two coats of paint.  I should be ok.  Maybe I will do three layers on the bottom and chinelogs...

That all being said, I want to point out again how she can ride on her side when turning her over:


This is HUGE.  To those who have extensive dinghy experience, you all know exactly what Im talking about:  Turn the boat over, get it on a side, attempt to balance it on the gunwale, fail, catch the boat, wrestle around one of the ends in an attempt to get to the other side, fail, watch boat fall to ground in a random direction, wince at possible damage, etc etc etc.  It sucks.  This baby, she rests on her side.  You can walk away.  Drink a beer.  Pick your nose.  Go on vacation.  She will sit, on her side, patiently.  Awesome.

Finally, I caught a Painted Turtle today.  This is a quite common turtle on the North American continent, and not as big or as long lived as the Blandings Turtle that I found a few days ago.  Whats neat about this one is that Ive been trying to catch one for a year.  Now, that doesnt mean Im out everyday like its my job, but many attempts and sneaky approaches have been tried, to no avail.  Catching this guy, while swimming, is a minor coup for you know who.  Me.  Quite beautiful.  Hissed at me when I picked it out of the water.  I put it back where I found it, and I hope it forgives me.

A little grumpy.  


Do you find information about Boat Plans Uk are you looking for? If not, below may help you find more information about the Boat Plans Uk. Thank you for visiting, have a great day.
Read More..

Boat Plans Uk | Wet on wet epoxy coating

| 0 komentar |

Boat Plans Uk


Today I coated one side of my BHs with two coats of epoxy to seal and waterproof the wood. I used the wet-on-wet method that Storer recommends. The first coat when on quite well, I used a small cheap squeegee thing to spread it around, and a small roller held stationary to smooth it down. I kept one BH on just using the spreader, to little difference. Once the first layer got tacky I added the second layer of epoxy, again with the squeegee and then rolled smooth. The second coat went on waaaaaay smooth and took less epoxy as well. I was actually surprised at how little epoxy this whole operation took. A little goes a long way.

At this point my wife called me to join her downtown for dinner, which I happily did. I thought I would have had enough time to get back to apply coat three, but I was wrong. I came back and the epoxy had all hardened up. Some bulkheads will have to be "de-waxed" and sanded for the final coat, because I need these to be waterproofed up. Others are good to go right now with two coats because in some places it went on a little thick. So Im good in some area, not so good in others, all in all, Im not worried. I made a little more work for myself, but oh well.


Damn. Those look good.

The gluing of the buttstraps and the chinelogs yesterday still goes. The temperature is maybe around 50 deg. in the garage, so today I built a heat box with a space heater and a sheet:


Not the most efficient design, but better than nothing under the circumstances. The glue has set up, but if I press firmly I can still get a fingernail in, which is a Storer-failure. So Im not touching anything and well wait until tomorrow before I move anything.

The dreaded stem still continues to stump me, but I shall solve it by jove!

Do you find information about Boat Plans Uk are you looking for? If not, below may help you find more information about the Boat Plans Uk. Thank you for visiting, have a great day.
Read More..

Boat Plans Pdf | More gaps between BHs and bottom

| 0 komentar |

Boat Plans Pdf


Today I planed down the chinelogs to flat, in order to fit the bottom at some point in the near future. Unfortunately for me, something somewhere didnt add up.

When I cut the notches in my BHs, I was very careful to use an actual slice from my chinelog to trace a pattern for the notch. Somehow, my notches were too deep laterally, I have gaps there that need filling. Today I now realize that they are also too shallow vertically... after planing the chinelogs flat, I have a gap between the bottom of the BHs and the chinelog. Take note from BH3:


When I fit the bottom onto the boat, the gap is clear (boat is upside down):


This is especially frustrating because:

1: I measured the notches using an actual piece from the chinelog
2: I was very careful to do my best eye-balling job that the bottom of the ply appeared to meet the bottom of the BHs

In retrospect I should have:

1: After the dry-fit turn the hull upside down to get a good look at what was going on
2: Do a test plane portion to see where a flat chinelog ends up in relation to the BHs

So now I can do one of three things:

1: Fill the gap with loads and loads of epoxy when I put on the bottom
- Risky because I could deform the bottom if I screw too hard placing it into position
2: Fill the gap with a strip of wood that is painstakingly cut and glued into place
-Annoying work, AND it wont match the BH bottom frame
3: Continue to plane down the chinelogs until they match the BHs.
-I lose freeboard AND it could make the boat too wide at the bottom and the pre-cut ply for the bottom wont be able to accomodate the new width.

For all its worth, heres the boat with the bottom kinda on:


Ive just decided that solution #3 is not a good one.

I have now just decided to go with option #2.

Interestingly enough, BH1 came out perfect!... WTF, Over?

Do you find information about Boat Plans Pdf are you looking for? If not, below may help you find more information about the Boat Plans Pdf. Thank you for visiting, have a great day.
Read More..