Tampilkan postingan dengan label rear. Tampilkan semua postingan

Dinghy Boat Plans | West Marine Thieving Scumbags

| 0 komentar |

Dinghy Boat Plans


I ordered some small parts (gudgeons for my rudder) for my boat from West Marine.

I received an email stating that the items have shipped.

I received an invoice in the mail stating the items have shipped.

After 10 days I called, looking for my parts.  "Theyre coming."

After 20 days, I called, looking for my parts.  "Call back next week."

I call back today, and they tell me that the items have not shipped.  They dont even have the items in stock.  There is no timeframe available when the items may be in stock.

They have my money, and I dont have any parts.  Need to find alternative plans now.

Do you find information about Dinghy Boat Plans are you looking for? If not, below may help you find more information about the Dinghy Boat Plans. Thank you for visiting, have a great day.
Read More..

Boat Plans Aluminium | Glassing the rudder bottom skids and an almost finished mast!

| 0 komentar |

Boat Plans Aluminium


AHOY Mateys!!!

WELL, things are not so bad.  As my intrepid readers may remember I had a mini freak out over my poorly glassed rudder and daggerboard.  This was founded on the belief that it was going to take me forever and a day to get them smooth again.  Not so!  With encouragement from others I got right onto it once the epoxy had gone hard.  With a few deft swipes of my rasp, my random orbital sander, and my hand block, I got the rudder all smooth again in just a few minutes.  I also sized it up for glass.


Then, back down to the basement Boatcave for the actual glassing.  I ended up stringing the rudder to a ceiling beam with some string (obviously) and two nails on either end of the rudder.  Presto!  Since Im draping the glass over the blade, it makes it easier and neater, and I can work at it at eye level instead of hunching over it, which is good for my sore back.  Unfortunately, it can swing around if not careful, so sometimes a hand is needed to steady it.


First, I wet the blade with epoxy and then draped it carefully over the leading edge, with the trailing edge facing down.  Wetting out the glass makes it go clear.  I let the first coat go tacky and then came back for subsequent coats to completely fill the weave.  The extra glass will get sliced off once it sets up a bit.  It look beautiful.  I did get some epoxy runs, but those will sand out (with substantial effort).  Hopefully I wont run into this with the daggerboard, but I have to find out how first.

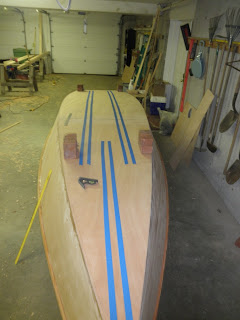
Then, off to the hull to put down some bottom skids.  These are made of cherry.  The plans call for two, a little over 10 feet long that run down the hull parallel to each other.  I decided to add a third in the bow for added bottom protection.  The bow has a nice rocker to it, but I will be sailing the Maine coast, and I also like to run my boats up onto the beach like a maniacal pirate looking for booty, both monetary and female (Im married, ladies, so its symbolic only now, sorry!)  Mr. Storer would prefer not glassing the bottom to save weight, I agree, and I dont want the hassle.  A bow skid was easy, light, and it will be effective.

First, I measured, re-measured, measured again, and outlined the skids, then put down some tape to assist in epoxy clean-up


This was not effective, because I gave myself a little room between the theoretical skid and the tape, and it ended up being too much space.  At least they were good guidance!  My lovely wife aided in placing down the skids, because they would slip around and I was not interested in screwing them down (more holes to fill).  My patented "Forest of bricks" held them down.


Interestingly enough, the forest of bricks didnt get them down all the way.  The two parallel skids rose amidships a bit off the hull, I could actually get some light between the hull and skid.  Extra weight did little to help, and only deformed the hull.  Not acceptable!  I decided to let it go, squeezed in some epoxy and when it dries Ill throw down some mini-fillets to keep water from getting underneath.


I did not notice this during my dry run, so I dont know if it was the glue that bent them funny, or maybe I wasnt obsevant, or what, but Im not going to freak out over this.

AND FINALLY

My mast was tapered up.  Notice I havent added the base taper yet to fit into the mast step, but the wide staves have been taken down to match.  Heres an artsy fartsy photo:


WOW look at that sky!  Hmm Hmm New England goodness!  Dont see that in Seattle too much, lemme tell you, I am happy to be back east!

Heres the mast up against the garage:


So, the mast came out to be a tad wider than commanded in the plans, about 3mm or so... I may enlarge the partner just slightly to accommodate the mast, because I dont want to lose any strength in that area. 

Do you find information about Boat Plans Aluminium are you looking for? If not, below may help you find more information about the Boat Plans Aluminium. Thank you for visiting, have a great day.
Read More..

Boat Plans For A Chesapeake Deadrise | Daggerboard trunk glued up and rear seat glued on

| 0 komentar |

Boat Plans For A Chesapeake Deadrise


Ok my patient mates, heres some photographic evidence of my work on the boat last week before I left for self-imposed exile at work.

First, I finally got that bedamned daggerboard trunk glued up.  Somehow, I wasnt forward thinking enough, and I glassed up the daggerboard without really giving much thought to how it fit in the already made trunk.  Well, I did but discounted further planing on of the daggerboard and decided that I was done with all the planing and sanding thank-you-very-much and whatever I had, I had.

This was most unfortunate, because I few more minutes of planing would have produced a superior quality board, and it would have fit in my daggerboard case.  So then I was stuck with the project of widening my case, but only by 2-3mm at most because really, all I needed was 1-2mm.

Fortunately, I found 3mm Okoume marine plywood at Goose Bay Lumber, and cut it to fit over the framing for the trunk.  This widened the trunk appropriately.  Here is the widening sequence in pictures:


Very self-explanatory, I think.

Next, I still struggle with the hardward issues for the rudder and transom gudgeons.  I dont know how Im going to get this rudder assembly attached to the boat.  The problem is that the hole to accomodate the tiller does not have the vertical clearance required to use a gudgeon-pintle scheme, which is by far the most convenient.  I toyed around with it and thought about enlarging my tiller-hole, but my pintle arms didnt fit around the rudder cassette.  A second order of larger, more heavy-duty gudgeons for rudder and transom fit great, except not with each other, and the arms were too long for the spacer in the cassette... A rod pushed through the gudgeons would not have fit cleanly and I would have had a clunky feeling rudder, the round peg in an oval opening thing, if you can visualize that.  So I still sit, wondering how I will fix this conundrum.  Many people have done it successfully, but Im still hunting around for the best hardware.

Because of all this drama, I have delayed gluing on the rear seat.  I got tired of having it loose, and glued it on before I left.  Here, yet again, is my "Forest of Bricks" holding it all down.


And the gratuitous parting shot:


Do you find information about Boat Plans For A Chesapeake Deadrise are you looking for? If not, below may help you find more information about the Boat Plans For A Chesapeake Deadrise. Thank you for visiting, have a great day.
Read More..

Boat Building Plans And Kits | Knees closer up rear seat inspection hatches

| 0 komentar |

Boat Building Plans And Kits


So earlier this month I neglected to show some closer up pictures of the knees and the breasthook.  Here they are.  You may notice that I chose to not stylize the knees in any fashion, as other Goat Island Skiffs do.  I am a big fan of straight lines, utilitarianism, and functionality.  (Also WPA artwork and air travel posters from the early 20th century, for very much the same reasons.)  Curvy knees and breasthooks are nice, but I dont think they deliver the straightforwardness I enjoy in design.  Obviously, this is personal preference.  Curvy knees can look fantastic.  The stem in the bow will be cleaned up at some point, maybe a small cover.


Today I also added the locations of my inspections ports.  I have chosen an 8" Beckson screw-in inspection port for easy ingress and egress of larger items.  The smaller 6" port is for access to the rudder gudgeon fittings.  It is off-center due to the seat cleat that runs down the middle of the compartment from BH4 to the transom.  This could have been circumnavigated had I thought about it beforehand, but I didnt, so this is what I get.  Not the end of the world.

Finally, a quick look on how I glued the knees in place:  Two tape covered shims held in place by clamps for vertical support, and the clamp just to weight it up against the side of the hull.  Not too much weight is needed, because the knee could slide up, also, if its beveled correctly it wont slide down.


Do you find information about Boat Building Plans And Kits are you looking for? If not, below may help you find more information about the Boat Building Plans And Kits. Thank you for visiting, have a great day.
Read More..