Tampilkan postingan dengan label skids. Tampilkan semua postingan

Boat Plans Aluminium | Glassing the rudder bottom skids and an almost finished mast!

| 0 komentar |

Boat Plans Aluminium


AHOY Mateys!!!

WELL, things are not so bad.  As my intrepid readers may remember I had a mini freak out over my poorly glassed rudder and daggerboard.  This was founded on the belief that it was going to take me forever and a day to get them smooth again.  Not so!  With encouragement from others I got right onto it once the epoxy had gone hard.  With a few deft swipes of my rasp, my random orbital sander, and my hand block, I got the rudder all smooth again in just a few minutes.  I also sized it up for glass.


Then, back down to the basement Boatcave for the actual glassing.  I ended up stringing the rudder to a ceiling beam with some string (obviously) and two nails on either end of the rudder.  Presto!  Since Im draping the glass over the blade, it makes it easier and neater, and I can work at it at eye level instead of hunching over it, which is good for my sore back.  Unfortunately, it can swing around if not careful, so sometimes a hand is needed to steady it.


First, I wet the blade with epoxy and then draped it carefully over the leading edge, with the trailing edge facing down.  Wetting out the glass makes it go clear.  I let the first coat go tacky and then came back for subsequent coats to completely fill the weave.  The extra glass will get sliced off once it sets up a bit.  It look beautiful.  I did get some epoxy runs, but those will sand out (with substantial effort).  Hopefully I wont run into this with the daggerboard, but I have to find out how first.

Then, off to the hull to put down some bottom skids.  These are made of cherry.  The plans call for two, a little over 10 feet long that run down the hull parallel to each other.  I decided to add a third in the bow for added bottom protection.  The bow has a nice rocker to it, but I will be sailing the Maine coast, and I also like to run my boats up onto the beach like a maniacal pirate looking for booty, both monetary and female (Im married, ladies, so its symbolic only now, sorry!)  Mr. Storer would prefer not glassing the bottom to save weight, I agree, and I dont want the hassle.  A bow skid was easy, light, and it will be effective.

First, I measured, re-measured, measured again, and outlined the skids, then put down some tape to assist in epoxy clean-up
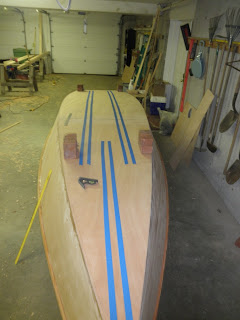

This was not effective, because I gave myself a little room between the theoretical skid and the tape, and it ended up being too much space.  At least they were good guidance!  My lovely wife aided in placing down the skids, because they would slip around and I was not interested in screwing them down (more holes to fill).  My patented "Forest of bricks" held them down.


Interestingly enough, the forest of bricks didnt get them down all the way.  The two parallel skids rose amidships a bit off the hull, I could actually get some light between the hull and skid.  Extra weight did little to help, and only deformed the hull.  Not acceptable!  I decided to let it go, squeezed in some epoxy and when it dries Ill throw down some mini-fillets to keep water from getting underneath.


I did not notice this during my dry run, so I dont know if it was the glue that bent them funny, or maybe I wasnt obsevant, or what, but Im not going to freak out over this.

AND FINALLY

My mast was tapered up.  Notice I havent added the base taper yet to fit into the mast step, but the wide staves have been taken down to match.  Heres an artsy fartsy photo:


WOW look at that sky!  Hmm Hmm New England goodness!  Dont see that in Seattle too much, lemme tell you, I am happy to be back east!

Heres the mast up against the garage:


So, the mast came out to be a tad wider than commanded in the plans, about 3mm or so... I may enlarge the partner just slightly to accommodate the mast, because I dont want to lose any strength in that area. 

Do you find information about Boat Plans Aluminium are you looking for? If not, below may help you find more information about the Boat Plans Aluminium. Thank you for visiting, have a great day.
Read More..

Boat Plans And Kits | Daggerboard case intallation spars

| 0 komentar |

Boat Plans And Kits


WELL Im on a schedule where Im home about 48 hrs a week, which means 47 hrs of boatbuilding, and 1 hour of laundry.  Not really.

So during my past 48 hrs home I got to it and was able to install the daggerboard case and I hit on a major find for my spars.

For starters, I dragged my boat out of the garage into the driveway and noticed a pronounced twist in the stern.  This.was.bad.news.  If the intrepid reader remembers, I glued down my rear seat last time, and gluing down the rear seat definitely locks in and twist into the hull.  Because of this I was super super careful to make sure there was no twist when I glued it in, using a level and some strategically placed buckets.  I ran outside and moved my boat... and the twist was still there.  There was no way I was going to get any work done if the boat was twisted.  Using some brute force and a rigid vacuum tube I rolled my boat to the pond and threw it in the water.... and she floated straight as a die.  No twist.  PHEW!!!  HOLY HOT HEART ATTACK BATMAN!

Back out of the water, I did some sanding in the interior of the hull to make it easier in the future, and went around installing the daggerboard case.  What is most important is that the case is straight.  If it comes off-kilter, Ive got a giant blade dragging me off into some obscure direction that Im going to counteract with the rudder, and its going to be drag city.  In order to make sure that the case is straight, I stretched a string from the center of BH2 to BH3 over the top of the case.


So here it is, mocked into position with my centerline string.  I tried at first to do this on the ground, but I got much better results up on the buckets.  I think the runners are slightly different and offering tweaked ground handling characteristics.

I cut the ribs for the front of the seat amidships.  They actually came out ever-so-slightly larger than needed- a mistake- that ended up helping me out in the end.  When I put the case into position it would slip around with the oversized rib, I could gently cajole the case into position which was verified by the string.  When everything was straight, I carefully clamped everything into position.  Youll notice the square behind the ribs next to the case to increase gluing area.  The port rib is a little higher than it should be (remember, they were a tad oversize) and Ill plane it down level for the seat installation.


This whole skeleton will be glued together by the center seat.  This, with BH3 and the forward ribs will create the lever that will hold the case in place.  Remember, when I capsize, Im going to be standing on the daggerboard to right the boat, with all my pressure on the case.  This massive gluing area will keep it from ripping out when Im in the water in the middle of nowhere.

Here are two shots of my daggerboard case lined up with my string.


In other news, I went over to Goose Bay Lumber to grab some Doug Fir 1x4s so I could glue up some spars.  I had come up with some crazy idea to put the spars together as a laminated structure since I didnt think Id find blanks that were large enough.  I did.  I found some finished 2x6 DF boards that were 20 feet long.  I had them cut to 12 feet.  A quick rip on my table saw, and I had two skinny blanks and one fat blank.


The spars are on average 40mm diameter.  I get 37mm with the blanks.  My spar is about 37mm x 40 mm or so.  Ill keep it like this for the length and not taper it.  Its kind of bendy, and I need some bendy up at the top of my sail, since I hear that the Duckworks sail can be a little flat.  This should help.  My boom will be 37mm x 50mm or so.  If these are too bendy, I can laminate some ply at key areas to stiffen it up.  This was a quick, easy, and totally suitable solution.  Easy!

Until next week, intrepid reader!

Do you find information about Boat Plans And Kits are you looking for? If not, below may help you find more information about the Boat Plans And Kits. Thank you for visiting, have a great day.
Read More..