Tampilkan postingan dengan label prototype. Tampilkan semua postingan

Pontoon Boat Plans Aluminum | Daggerboard planing rudder blank transom re enforcement Oar Prototype 1

| 0 komentar |

Pontoon Boat Plans Aluminum


Well, a busy frenetic post. Lots of small items got done over the past few days on my Goat Island Skiff.

Daggerboard planing:

The daggerboard needed to get smoothed out. It was a lumpy mess.


I didnt know whether to hit it with the orbital sander or my hand plane. I really just want to feed it through a real machine plane since I need to lose 2mm off the blank, but maybe Ill do that by hand... (?) However, in the end I got a roughly smoothed out daggerboard using my hand planes. It was not as tortuous as I thought it would be, and it all worked out pretty good in the end.


Rudder blank:

I also needed to get my rudder glued up. Initially this had not occured along the daggerboard due to the lack of appropriate timber, I had used my supply dedicated to the blades for the daggerboard mostly. However, I did have a lump of cedar left over from the stem. I had forgotten about this one. It took a few minutes of brainstorming, a couple of swipes on the table saw, and in no time I had my blank, and it was glued up on underneath the ubiquitous heat tent in my 45 deg. F garage.


A different wood pattern than the daggerboard, but that is OK by this amateur!

Transom:

Then it came to my attention that my transom was not backed up enough for the rudder. The intrepid reader will remember when I put the backing to the rudder gudgeons on the transom. It was a sticky mess. WELL I should have looked at Duckworks first and checked out the dimensions of the equipment I was going to use. Then, I could have fitted an appropriate backing. I did not. My backing was far too inadequate, so today I added sides to it for a 6" width, and then sandwiched on another solid layer on top.


The brick weighs it all down.

Finally, how in tarnation am I going to propel this boat when there is no wind? By oar!

Oars-- Oar Prototype #1:

My oarlocks, sockets, and another hatch came in the mail yesterday.

YAY MAIL!

The oarlocks are beautiful. I got two pairs of sockets, one for the gunwales, and another pair so I could have a socket on the transom, in case I lose an oarlock or oar, I can still yuloh my way to shore and safety. Search yuloh.

This also means it was time to try my hand at oar-making, which interested my lovely wife.

Jim Michalak offers us some oar plans in his book, Boatbuilding for Beginners, and I used those. Storer also has free oar plans available, but Michalaks were simpler, and I decided to mix and match a little bit. No problems, right? Haha.

My oars for the GIS should be about 9. Technically, 92", which is what we used. I bought two cheap pieces of pine lumber to make my oars, 10 long each. Each board will offer up all three layers for the laminate construction of this oar. The plans call for oars that are 6 11" long. We extended these oars 23" (27") by using a formula at Shaw and Tenny oar-makers extra-ordinaire.

58" (width lock to lock) / .5 = 29 + 3 = 31" of inboard length.

The grip on these plans are 5" long and the inboard portion of the loom is 16", so we added 10" to make it 26" + 5" = 31"

The remainder of the 27" was 17" and we added this to the outboard section of the loom.

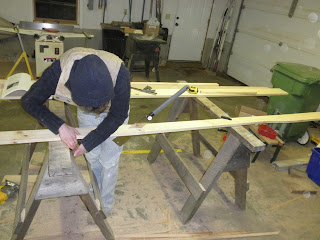
Then, off to map the stations, trace and cut.

After some deliberation I decided to cut the entire oar, all three blanks, by hand. So away I ripped with my Japanese handsaw. It was more accurate than the jigsaw, and quieter. The table saw would have been a sweat-fest. Here we are, half-way through one side of the main blank:


Then, with 4" to go on the last laminate side, a eye-knot snapped, and sent the last 6" of one of the laminates that attached to the blade soaring into the garage. BOO. I had just ripped 20 feet of board by hand, and the last 6" decided to let go.


So I decided that this end was going to get the shaft (haha) and it was going to be a little short. Prototype #1, right?

I did a mini-scarf by cutting right on through the two pieces, eliminated the knot, using the method illustrated below:


Then, off to the basement for the gluing!


Do you find information about Pontoon Boat Plans Aluminum are you looking for? If not, below may help you find more information about the Pontoon Boat Plans Aluminum. Thank you for visiting, have a great day.
Read More..

Boat Designs And Plans | Oar Prototype 1

| 0 komentar |

Boat Designs And Plans


I lost power and internet for a bit during the big blow the other day, and never posted pictures of the oar. The following day I decided to shape the oar up. Using my plane, block plane, random obit sander, chisel, and wishing that I had a spokeshave, I went to work. In about three hours I got the below product. As you may notice, there is a kink where the blade meets the loom. Also, I screwed up the shaping a bit.


I mean, for a first oar done in three hours, not bad.

The blade is kinked to the loom most likely because each measurement station was taken off the edge of the board as opposed to off a theoretically straight line connecting the two ends. So if there was any deviation in the way the board has been originally cut (most likely) then the oar would reflect that in waviness-- and thats what happened. My next oar measurements will be based off a straight line down the board.

Second, I started shaping the oar without squaring it first. This would have been an easy endeavor, however I was excited to get started and planed the thing into an oval. If I had made sure all 4 sides were square, it would have been a circle.

The grip is also oval, I think it might be rough on the hands. I should not have cut it out in the blanks, and shaped it at a block, that way I could have made it a circle with a 1 1/4" diameter as opposed to the 1" it is now (a little small for me).

In the end, an easy plan, a nice looking oar, its light, and with the pine was easy to shape.

Prototype #2 is in the works. This too, will probably be a scrapper because I already cut out the grip and then realized the advantages of cutting it out when the blank was glued up.

Do you find information about Boat Designs And Plans are you looking for? If not, below may help you find more information about the Boat Designs And Plans. Thank you for visiting, have a great day.
Read More..

Boat Plans Aluminium Australia | Rudder stock design 4 Mast gluing

| 0 komentar |

Boat Plans Aluminium Australia


In yet another installment of "I try to re-design the rudder stock" I have received yet another set of plans from a Goat Island Skiff builder in New York.  He has graciously supplied me with these two schematics of his own design, as a solution to removing the tiller from the rudder assembly without having to take the rudder off the transom.  It is self-explanatory:


I really like this design, it is better than mine for two reasons:  1. It maintains Mr. Storers rudder stock design and hopefully solves the structural issue that he was concerned about, 2. There is less time fiddling over the transom pulling very critical pins over water of yet-to-be-determined depth, if you get my drift.  I can remove the tiller from the safety of the cabin.  Unfortunately, I will still have a stub of tiller sticking into my domain, but I think, for now, this is the idea Im going to go with.  The great thing about the rudder stock is that it is simple and easy to construct, I can always make another.

In other news, the mast was glued in its first step today.  In the previous post, I shaped the narrow staves.  This was a workout, but I worked carefully, and Im happy with the result.  Then, off to make the spacers for the ladder frame.  I used a piece of fir that was lounging around the garage, some stud material.  I used some good parts, and cut them to fit.  The base plug meant a trip to Lowes.  This is the first wood part of the boat that was not bought at either of my two local lumber stores.  Sorry guys.  Anyway, an 8 piece of 4x4 cedar.  I thought about using fir, for a few bucks less, but I went with the rot-resistant cedar.  Its an important piece, its light, and it should be good.  The other spacers Ill goo up with epoxy and make them plastic.


Well, that was interesting how the photos lined up, but I like it!  Notice the base plug.  After a quick mock-up my lovely wife and I took one of the uncut stave stock pieces and brought it into the basement, where I can get an even floor workspace and a slightly higher temperature, better for quicker gluing.  We made sure that we could get the wood in and out of the basement two different ways, so I dont build the mast and then get it out.  I am positive I can get the mast out of the basement.

Layed out ready for the dry fit:


Sweet, I did it again, but I dont know how.  The mast is quite straight, but I decided to use one of the wide uncut staves as a backbone for gluing, that way I could ensure that the mast is straight with no wobbles.  It also gives me a good even workspace for gluing too.  I covered one stave with packing tape, and glued away:  Notice too, the hardwood runners that will be glued to the bottom of the hull, they are long ones and needed to be scarfed.


It went well.  The bricks are slightly nudging the mast into a straight position.  Youll also notice that you dont see much of the wide stave underneath this glue-up, thats because the tolerances are super tight.  I overcut my narrow staves by 1mm and it pretty much ate up all the space on the wide stave.  I briefly considered re-planing the staves, re-working the spacers, and then gluing, but my lovely wife stopped me with some business graduate degree mumbo-jumbo stuff and talked me out of it.  I might have to plane a little extra off the base to get it to fit in the mast step, and I can (with difficulty) enlarge the mast step as well if need be.

Tomorrow, gluing the wide staves and completing the box.
 

Do you find information about Boat Plans Aluminium Australia are you looking for? If not, below may help you find more information about the Boat Plans Aluminium Australia. Thank you for visiting, have a great day.
Read More..

Boat Plans African Queen | Rudder design 3 and shaping the mast

| 0 komentar |

Boat Plans African Queen


A little more thought into the rudder today.  Since Mr. Storer is concerned about the tiller splitting from the forces, he would like to see a thru-bolt through the tiller, into the spacer block.  So I thought, how about a removable thru-bolt that could be tightened with a butterfly nut, or something like that?  The adjusted illustration is below:


In other much more exciting news... I started shaping the mast!

This is awesome, because Id love to see my mast.  Hmmm Hmmm mast.  Powerhouse piece of lumber that gets me from A to B for free.

I am building the Hollow Square Mast option, of three that come with the boat (Solid Round, Birdsmouth are the other two).

First off, I must loft the dimensions of the narrow staves onto my lumber.  One piece of lumber has a slight curve in it.  I didnt think too much of it, and sawed 1cm off the edge of the lumber.  Big mistake!  The curve was more than I anticipated, and I didnt think I had the room to actually loft a narrow stave!  I was seriously pissed, pounded my broom on the floor, and let out of primordial yell.  A screwed piece of lumber means 25 bucks in the hole, a trip to the lumberyard, hoping to find a piece long enough, travel up north to the planer, using the planer, then back home.  Its a process!

Mr. Storer has a fabulous option in his plans for curved pieces of lumber however, "The String Down the Middle" method.  So, I marke the middle of each end and attached a string between them, and got this:


As you can probably tell, the string is way near the edge, too close to loft the mast using this as the backbone.  I had to adjust the string to get me the most amount of wood:


Then, I lofted it on, hoping for the best... and it worked!  I was just able to get it on with a little left over.  It made for a strange visual illusion, with straight lines cutting every-so-slightly diagonally across the grain, but it worked well, and for that, I was happy.  As you can see, the top of the mast is very close to the edge:


With the mast material propped up between two table extenders and my clamp table (50lb bag o seed keeps it from moving) I planned the staves down to the lines.


I then matched them up and got it as close as possible.  Since were making a box here, its very important to keep things square, equal to each other, and the same size.  This is a precision operation.  Once the staves are glued in their ladder format, the wider boards can be glued right on, and then trimmed, making life a little easier on that front, at least.  Sweet.  Mast.


Do you find information about Boat Plans African Queen are you looking for? If not, below may help you find more information about the Boat Plans African Queen. Thank you for visiting, have a great day.
Read More..