Tampilkan postingan dengan label painting. Tampilkan semua postingan

Boat Plans Pdf | Painting Priming

| 0 komentar |

Boat Plans Pdf


We are now in the finishing stages of this particular Goat Island Skiff.  Shes coming down the home stretch, I tell you!

To be honest with you, dear intrepid reader, I am several posts out of date with the current going-ons.  Work has been a killer recently and I just cant get on top of it.  Back to work tomorrow to boot, and I still havent done my laundry.  Lets just say time at home is at a super mega premium.

The boat, once faired, was ready for priming.  To accomplish this, I wanted a good sanding job over her so the primer would adhere real nice like.  Using stacks of 120 grit discs on my random obit sander (ROS) I spent a bulk of a day sanding her down to a nice matte finish.


 You can see the Quick Fair that I gushed about in the last post.  Also notice the buckets, without the towels on them.  This was a slip-up on my end, and they ended up gouging the transom.  Smooth-move Ex-Lax!!!  Im such a moron.  The boat is taped up, including the ends of the ply.  These are kind of critical since they are exposed ends of ply that will be submerged at times.  They are well encapsulated in epoxy and I will paint them as well.  This adds protection, and a classic look.

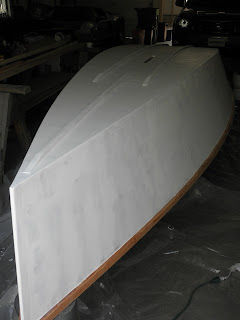
Then, for the first coat of primer!  I used a quart of Interlux Pre-Kote primer, slightly thinned with Interlux 333, a thinning agent.  This stuff is mega-not-cheap, as in 34 bucks a quart, or 136 bucks a gallon, if youre the type that enjoys heart attacks.  It is a high-build primer, which means it will fill small irregularities in the prepped surface.  In practice, the painter will apply one coat, sand it down leaving the crevasses filled with primer, and then throw on another coat of primer, lightly sand it smooth, and then top-coat.

Initially the primer went on rather thick, I didnt thin it at first.  A few drops helped things along immensely.  I used a roller, and the roller would apply the paint unevenly, heavy where the roller initially absorbed the paint and then thinner on the other sections, leaving a speed-bump appearance to paint coverage.  Later research at the paint store revealed some roller tricks, which I will cover later.  Here is the boat, with the first coat of primer.


Then, its time to sand away!  Again, using the ROS and 120 grit discs.  I sanded outside, as this stuff tends to blow dust everywhere, which it did.  My father-in-law has a little car in the garage that he fawns over, I didnt want to get it dusty.  Fortunately, I had good weather, and was able to charge ahead.


Shes looking like a proper work-boat now.  This took a few hours.  I used many sanding discs, about one every three to four feet initially, and then in subsequent passes a increased the acreage with a disc.  The point is to get a good clean cut and not be pressing down trying to get a filled-up worn-down disc to grind away, smooth is the point. Speaking of smooth, this primer, albeit dusty, was quite smooth to the touch, surprisingly so.  After this, I de-dusted her by blowing with a shop-vac, vacuuming with said shop vac, and then rubbing down with cloth soaked in something flammable or toxic, like 333 or de-natured alcohol.  After that dried, the next coat of primer


WOW!  Shes coming along now!  AND THEN I had to leave for work, and I left her for 5 days.  This was not necessarily good, because this primer can absorb humidity, which can then prevent adhesion of the top-coat.  For 5 days I chewed my fingers down to bloody stumps pounding on Intellicast looking for possible bad weather.  I left explicit instructions with my parents-in-law about when to have the garage open or closed.  Fortunately, things turned out great weather wise!

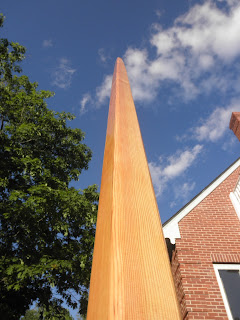
More on painting later.  Im also varnishing my mast.  My wife is helping and she is doing a fantastic job.


Notice the tree is green.  This means GO, as in GO SAILING, as in FINISH THIS BOAT.  Im trying!  Im trying!

When I got back from my trip, I immediately set to sanding the second coat of primer.  Again, same as before, but a little less aggressive this time.  I wanted to keep the primer, but wanted to smooth it out.


Thats not my dog.

The paint and the sun illuminated some things on my boat.  When I faired the boat with Quick Fair I was absolutely anal to make sure I got smooth chines.  I wanted to make sure I had the fairest boat I could possibly have.  I actually spent hard-earned days off fairing and then waiting for it to cure so I could sand it and then fair again before I started the long painting procedure.

So imagine my surprise when I get her out in the sun after she was painted in something that shows shadows really well, like, lets say, a white primer.


OH THE PAIN!!!  WHERE DID THIS COME FROM?  Im heartbroken, a little bit.  I put in the ruler to help you judge.  Its a 16" ruler.  I swear on whatever holy tome of your choice, that I did not notice this when it was in the garage.  I even used setting-sun light to grab inconsistencies like this on the boat, and didnt see it.  It happens sporadically on the port chine, specifically.  The starboard came out pretty bitching if I may say so myself.  Needless to say Im disappointed.  My friend Matt who is always swatting away the mental flies that cloud my judgement was good enough to say something that went like this:  "Im sure I wont notice it, just add it to your laundry list of items you want to take care of next winter, theyre going to rack up anyway as you sail it this year."

Hes right.  If I was home every night I would take my time and lollygag around and be able to fix this.  Time for me is at a premium.  Every day I spend on details like this could translate into weeks and/or months of delays for me.  I screwed it up, I have to live with it for now.  Its actually not that bad, in this picture it looks horocious (new word), but in reality its not that bad.  Surface scum will obscure it anyway.


Do you find information about Boat Plans Pdf are you looking for? If not, below may help you find more information about the Boat Plans Pdf. Thank you for visiting, have a great day.
Read More..

Boat Plans Aluminum | Painting Top Coat

| 0 komentar |

Boat Plans Aluminum


This is a big post.  Big as in:  Holy Baloney Batman, were getting close to the end!  Goat Island Skiff, activate!

After priming my boat, I had to leave for work.  I got home 5 days later, gave it a good smoothing sand job, and then cleaned up the dust with the shop-vac blower to vacuum to rag soaked in denatured alcohol.  The denatured alcohol was a tip mentioned on the Wooden Boat Forum-- it will help soak up and evaporate any water that had absorbed into the primer as well as clean up dust.  After that, it was time for painting.

The paint was Interlux Brightside, a one part marine paint.  Its expensive, about 40 bucks or so a quart depending on where you purchase it.  I decided to use the pricey stuff as opposed to Behr Porch Paint or Rustoleum Enamel because I figured Ive spent so much money on this boat already, I might as well use good paint on the exterior as well.  Its just a bit more anyway, and it was well worth it, as you will see.

I used a roller, which left behind little bubbles, and then "tipped-off" with a bristle brush.  I would generally roll vertically and then gently tip-off with a brush horizontally.  Then I let it dry.  The instructions recommend sanding with 320 before the second coat, but I only had 220 and used that, with little ill effect.  A second coat then was applied, and the results are spectacular.  Behold, my painted boat:


Not bad!  Check out the reflection of the towel!  It looks like gel-coat!  I am the painting man, thanks to Interlux Brightside and its easy-to-apply-million-dollar-finish qualities!

Next up, the interior, and sailing.

For the super vigilant, they will notice I still do not have rudder hardware on the stern.  This is bad news, and there will be a post devoted to rudder hardware, Duckworks (awesome), and West Marine (awful evil disgusting chain store I will never frequent again).

Let me just say this, if my boat gets finished and I dont have rudder hardward and this impedes me from sailing, I am going to freak out.

Do you find information about Boat Plans Aluminum are you looking for? If not, below may help you find more information about the Boat Plans Aluminum. Thank you for visiting, have a great day.
Read More..

Plywood Boat Plans Australia | I make my first bevel

| 0 komentar |

Plywood Boat Plans Australia


I had to bevel the seat cleat on the transom for the rear seat. This is a harrowing proposition for me because, a: I do not know how to bevel things, and b: I do not want to screw this up too much because then nothing will fit. Fortunately, I had the mind to ask over at the Storer woodworking forum first, and basically, I take my hand plane to it and plane away. So thats what I did, and I successfully beveled my seat cleat the 4mm. PHEW! Not so bad! Of course, I say that now. Time to start learning how to keep my plane blade sharp. Heres a pic, but the cleat is not oriented in the correct position, worry not GIS fans!


Do you find information about Plywood Boat Plans Australia are you looking for? If not, below may help you find more information about the Plywood Boat Plans Australia. Thank you for visiting, have a great day.
Read More..

Boden Boat Plans Australia | Framing the transom

| 0 komentar |

Boden Boat Plans Australia


Ooooh boy, Im in it now. I got home after being on the road for almost two weeks and immediately picked back up on working on the boat. I decided to frame the transom. I cut the cedar parts to frame the sides, the bottom, and the seat cleat in 2:45. I thought it would go significantly quicker, but it didnt because it was a little more complicated than I thought, and my framing was fraught with multiple mistakes. I also do not have a solid piece of cedar for the top piece, which needs to be wider than any of my stock. Maybe Ill use two pieces, maybe that will have to wait.

The first mistake was correcting an old one... the transom needs 7mm of extra on the sides of the ply and 12mm extra on the bottom. I figured this was extra that was going to be cut off, so I threw in a few extra mm to make round numbers. Turns out the 7 and 12 is important, because I will be basing the bevel of the sides and bottom off these numbers. Fortunately I read the section first before, cleaned up the lines to the correct length, and then cut and sanded smooth.

After that, it was a comedy of errors cutting the cedar to fit appropriately. In the end, it looks good, tight, and straight. Next up, I have to glue it all on and/or seal the ply in epoxy and then glue it on. I also do not know how to bevel any of this stuff. This is something I am going to have to ask about for because I dont know how to do it simply and without screw up. Time to phone the collective.

Do you find information about Boden Boat Plans Australia are you looking for? If not, below may help you find more information about the Boden Boat Plans Australia. Thank you for visiting, have a great day.
Read More..

Boat Plans Butler | Sailing time 3

| 0 komentar |

Boat Plans Butler


Ok, back to some sailing today with my Goat Island Skiff!  I had to take a hiatus the past few days to take care of some issues, but this afternoon I picked up my sail from Withum Sailmakers, who added some grommets along the original reef points, and a third reef, which will be the new first reef, half-way from the foot to the original first reef.  See picture.


This set up came highly recommended by the sailmaker, and my buddies over at the Storer Forum thread where we are discussing the Goats handling characteristics.  This will give me more options for reefing whether I am solo, or with a crewmember.

In addition, Ive adjusted my downhaul.  Previously, I had a downhaul that also went to the forward section of the boom and this was affecting my ability to dump power when a gust hit, and this contributed to me dumping the boat in Force 3 when I was solo.  It was a frustrating day, and in so small way my downhaul had a part to play.  This is what the downhaul looks like now.  Its still not what I want, because I lack the hardware, but its better than what it was, and it the difference was noticeable. 


Now there are some problems in this picture.  I need some more tension at the tack, and you can see the first grommet of the foot is pulled tight against the plastic zip-tie.  Either I need to tie down the entire foot, or re-enforce this area.  This force was created by the extra down force on the downhaul.  This extra force on the downhaul keeps the rig from swinging forward.  Though, as you can see in this pic of my going downwind, the downhaul is not parallel with the mast, because there is still not enough force, and by the end of the sail, the boom had inched forward.  More purchasing power on the downhaul will fix this.

OH! And here she is at anchor.  Pretty!


Do you find information about Boat Plans Butler are you looking for? If not, below may help you find more information about the Boat Plans Butler. Thank you for visiting, have a great day.
Read More..

Boat Blind Plans | Second sailing solo this time

| 0 komentar |

Boat Blind Plans


 No pictures today folks.  I was too busy swimming or trying to stay dry.  What follows below I also posted at the Woodwork forum for Storer boat designs.  It sums up my second sail rather well.  A very interesting conversation is ensuing for those that are interested in handling the Goat Island Skiff.

**********

I have extensive racing experience in Blue Jays, Lasers, 420s, FJs, and recreational experience in Beverly dinghies and Beetle Cats. All marconi rigs except for the gaff Beetle Cat. I am an athletic 30yr old and weigh 150lbs.

The first time I went sailing in my GIS it was in a force 2- light breeze with my wife. The boat handled superbly.

I went sailing today for the second time in my boat, and I was by myself, and it was force 3- gentle breeze with some higher gusts. I got spanked by my GIS in ways I didnt even see coming, and Im surprised and a little humbled. I went sailing planning on a picnic as I cruised up and down the lake tweaking the rig. Instead, I went swimming.

So, as I headed out things were looking good. Its 65F (18C) and overcast, with a good breeze and slightly chopped water. I was un-reefed full sail, sitting on the rail and humming along, with a little bit of heal. A gust came up that I saw coming and I let out the sail a bit. This did not stop the boat from going over. I completely let go of the main and dumped it, but she still went over. Water poured over the gunwale, and that was it, I was in the drink and my flip-flops were floating away. That was fast. I swam around and clambered up on the daggerboard, no problems there, she came right up but obviously swamped. Balancing the boat was precarious. The nose was down, and I feared a breach in the forward compartment. I bailed her out with my 5 gallon bucket, and checked the forward compartment, it was dry.

I decided to reef. My sails are the stock Duckworks sails, with no reef points except the grommets along the luff and leach, its the full-batten idea.

In my personal opinion, the full batten idea is not conducive to reefing underway, especially with a sail this large. I was skeptical when I ordered it but decided to go with it anyways since it came with Miks recommendation and he looks so comfortable on his beautiful Beth. I found that that when situated in the bow of the boat the GIS is highly unstable due to its narrow beam in this area, and this was in only lightly chopped water. I tied off the "new" tack of the sail and then tied off the clew and re-hoisted the sail.

The full-batten sail with two reefing points cannot exert enough pressure along the boom to keep the sail folded up. Despite repeated attempts at re-tensioning the clew and tack and "new" outhauls I was not able to get enough tension along the "new" foot of the sail to keep it under the batten. As the chop increased, it became a more precarious situation to sit up in the bow fiddling with the tack. I attempted to keep the boat pointing in the wind, but with the large windage in the bow, it kept falling off the wind. A mizzen in this case would have helped immensely. Kudos to Clint and John.

Sailing a half-way reefed sail with a large pregnant foot billowing out I sailed close to shore and dropped anchor.

Dropping the rig I sat up in the bow to re-tension the new tack and clew, and found myself back in the water, as I capsized again, quite unexpectedly. As said before, the boat is unstable with no one else on board and the sole occupant up on the forward seat. This happened really quick.

I bailed the boat back out and made the tension along the reefed foot as tight as possible. As I headed back out to sail some more, the boat really moved along with the first reef. Exhilarating! However, the sail pulled back out of the batten, and I got the "pregnant" foot again. This is not conducive to pointing into the wind. At one point, I could not even tack, the boat kept falling off. I was almost forced onto some rocks, so I jibed around to remedy the situation. This was immensely frustrating, as you can imagine. Was it due to the rather flat head on the Duckworks sail?

Needless to say, I found that the GIS exhibits the following attributes:

*Difficult to de-power the sail in gusts. (is this an attribute of the balanced lug? I have zero experience with this)

*Unsteady when sole occupant is in the bow.

*The full-batten two-grommet reefing idea is either frustratingly difficult to accomplish successfully or only viable when launching reefed-- reefing underway with this fashion system is precarious at best.

*Boat has difficulty tacking through the wind when reefed.

Obviously I would like these remedied. My multi-day Maine coast trip is at risk unless I can figure these out. Im happy I didnt finish in March, or it would have been a very cold day indeed. My sail is going to get extra reef grommets immediately prior to any more sailing.

These are my first impressions of the GIS, but I would like to hear yours, or from anyone who can shed some light on this issue. The lug rig, as I understand, is a "reef early, reef often" rig, and I can attest to that. I would also like to know why I wasnt able to depower the sail to stop the capsize.


One thing I would like to emphasize:   This boat has 105 square feet of sail area.  Most boats this size have anywhere between 65-80 square feet.  This boat is overpowered, there is no doubt.  This makes it awesome in light airs, and its a necessity to reef when it gets heavy, especially when alone.  Just something to keep in mind.

Laser:          76 square feet of sail (crew of 1)
Beverly:       66 square feet of sail (crew of 1)
Walkabout:  80 square feet of sail
Mayfly16     91 square feet of sail
Beetle Cat:  100 square feet of sail (and 450lbs hull weight!)
FJ:               100 square feet of sail (crew of 2)
420:            140 square feet of sail (crew of 2)


Oh, she looks really pretty at anchor as viewed from the shore, and I continue to get "thumbs up " when driving on the highway.  

Do you find information about Boat Blind Plans are you looking for? If not, below may help you find more information about the Boat Blind Plans. Thank you for visiting, have a great day.
Read More..