Boat Plans Pdf
We are now in the finishing stages of this particular Goat Island Skiff. Shes coming down the home stretch, I tell you!
To be honest with you, dear intrepid reader, I am several posts out of date with the current going-ons. Work has been a killer recently and I just cant get on top of it. Back to work tomorrow to boot, and I still havent done my laundry. Lets just say time at home is at a super mega premium.
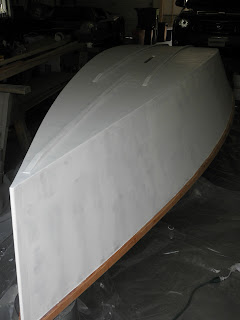
The boat, once faired, was ready for priming. To accomplish this, I wanted a good sanding job over her so the primer would adhere real nice like. Using stacks of 120 grit discs on my random obit sander (ROS) I spent a bulk of a day sanding her down to a nice matte finish.

You can see the Quick Fair that I gushed about in the last post. Also notice the buckets, without the towels on them. This was a slip-up on my end, and they ended up gouging the transom. Smooth-move Ex-Lax!!! Im such a moron. The boat is taped up, including the ends of the ply. These are kind of critical since they are exposed ends of ply that will be submerged at times. They are well encapsulated in epoxy and I will paint them as well. This adds protection, and a classic look.
Then, for the first coat of primer! I used a quart of Interlux Pre-Kote primer, slightly thinned with Interlux 333, a thinning agent. This stuff is mega-not-cheap, as in 34 bucks a quart, or 136 bucks a gallon, if youre the type that enjoys heart attacks. It is a high-build primer, which means it will fill small irregularities in the prepped surface. In practice, the painter will apply one coat, sand it down leaving the crevasses filled with primer, and then throw on another coat of primer, lightly sand it smooth, and then top-coat.
Initially the primer went on rather thick, I didnt thin it at first. A few drops helped things along immensely. I used a roller, and the roller would apply the paint unevenly, heavy where the roller initially absorbed the paint and then thinner on the other sections, leaving a speed-bump appearance to paint coverage. Later research at the paint store revealed some roller tricks, which I will cover later. Here is the boat, with the first coat of primer.


Then, its time to sand away! Again, using the ROS and 120 grit discs. I sanded outside, as this stuff tends to blow dust everywhere, which it did. My father-in-law has a little car in the garage that he fawns over, I didnt want to get it dusty. Fortunately, I had good weather, and was able to charge ahead.


Shes looking like a proper work-boat now. This took a few hours. I used many sanding discs, about one every three to four feet initially, and then in subsequent passes a increased the acreage with a disc. The point is to get a good clean cut and not be pressing down trying to get a filled-up worn-down disc to grind away, smooth is the point. Speaking of smooth, this primer, albeit dusty, was quite smooth to the touch, surprisingly so. After this, I de-dusted her by blowing with a shop-vac, vacuuming with said shop vac, and then rubbing down with cloth soaked in something flammable or toxic, like 333 or de-natured alcohol. After that dried, the next coat of primer

WOW! Shes coming along now! AND THEN I had to leave for work, and I left her for 5 days. This was not necessarily good, because this primer can absorb humidity, which can then prevent adhesion of the top-coat. For 5 days I chewed my fingers down to bloody stumps pounding on Intellicast looking for possible bad weather. I left explicit instructions with my parents-in-law about when to have the garage open or closed. Fortunately, things turned out great weather wise!
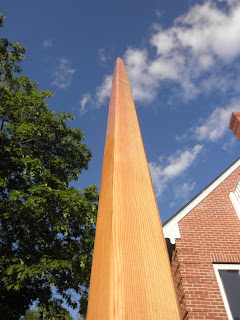
More on painting later. Im also varnishing my mast. My wife is helping and she is doing a fantastic job.


Notice the tree is green. This means GO, as in GO SAILING, as in FINISH THIS BOAT. Im trying! Im trying!
When I got back from my trip, I immediately set to sanding the second coat of primer. Again, same as before, but a little less aggressive this time. I wanted to keep the primer, but wanted to smooth it out.

Thats not my dog.
The paint and the sun illuminated some things on my boat. When I faired the boat with Quick Fair I was absolutely anal to make sure I got smooth chines. I wanted to make sure I had the fairest boat I could possibly have. I actually spent hard-earned days off fairing and then waiting for it to cure so I could sand it and then fair again before I started the long painting procedure.
So imagine my surprise when I get her out in the sun after she was painted in something that shows shadows really well, like, lets say, a white primer.

OH THE PAIN!!! WHERE DID THIS COME FROM? Im heartbroken, a little bit. I put in the ruler to help you judge. Its a 16" ruler. I swear on whatever holy tome of your choice, that I did not notice this when it was in the garage. I even used setting-sun light to grab inconsistencies like this on the boat, and didnt see it. It happens sporadically on the port chine, specifically. The starboard came out pretty bitching if I may say so myself. Needless to say Im disappointed. My friend Matt who is always swatting away the mental flies that cloud my judgement was good enough to say something that went like this: "Im sure I wont notice it, just add it to your laundry list of items you want to take care of next winter, theyre going to rack up anyway as you sail it this year."
Hes right. If I was home every night I would take my time and lollygag around and be able to fix this. Time for me is at a premium. Every day I spend on details like this could translate into weeks and/or months of delays for me. I screwed it up, I have to live with it for now. Its actually not that bad, in this picture it looks horocious (new word), but in reality its not that bad. Surface scum will obscure it anyway.

Do you find information about Boat Plans Pdf are you looking for? If not, below may help you find more information about the Boat Plans Pdf. Thank you for visiting, have a great day.
0 komentar:
Posting Komentar